> ## Documentation Index
> Fetch the complete documentation index at: https://help.experro.com/llms.txt
> Use this file to discover all available pages before exploring further.
# Banners
Experro **Banners** lets merchandisers place promotional content within **Search Results**, **Category Pages**, and **Collection Pages** — directly from the Discovery dashboard.
Banners are built in two stages: **creating the banner** asset, then [**attaching it to a Merchandising Rule**](/experro_discovery/merchandising/rule_types/banner_rule) that controls placement and schedule.
Let us start with **creating a Banner** first.
For a feature overview and use-case examples, see the [Banners Overview page](/discovery_suite/banners/overview).
# Creating a Banner
Select the grid icon at the top left of the application. Select **Discovery** from the dropdown menu. On the **Discovery** screen, navigate to **Banners** from the left panel under **Discovery**.
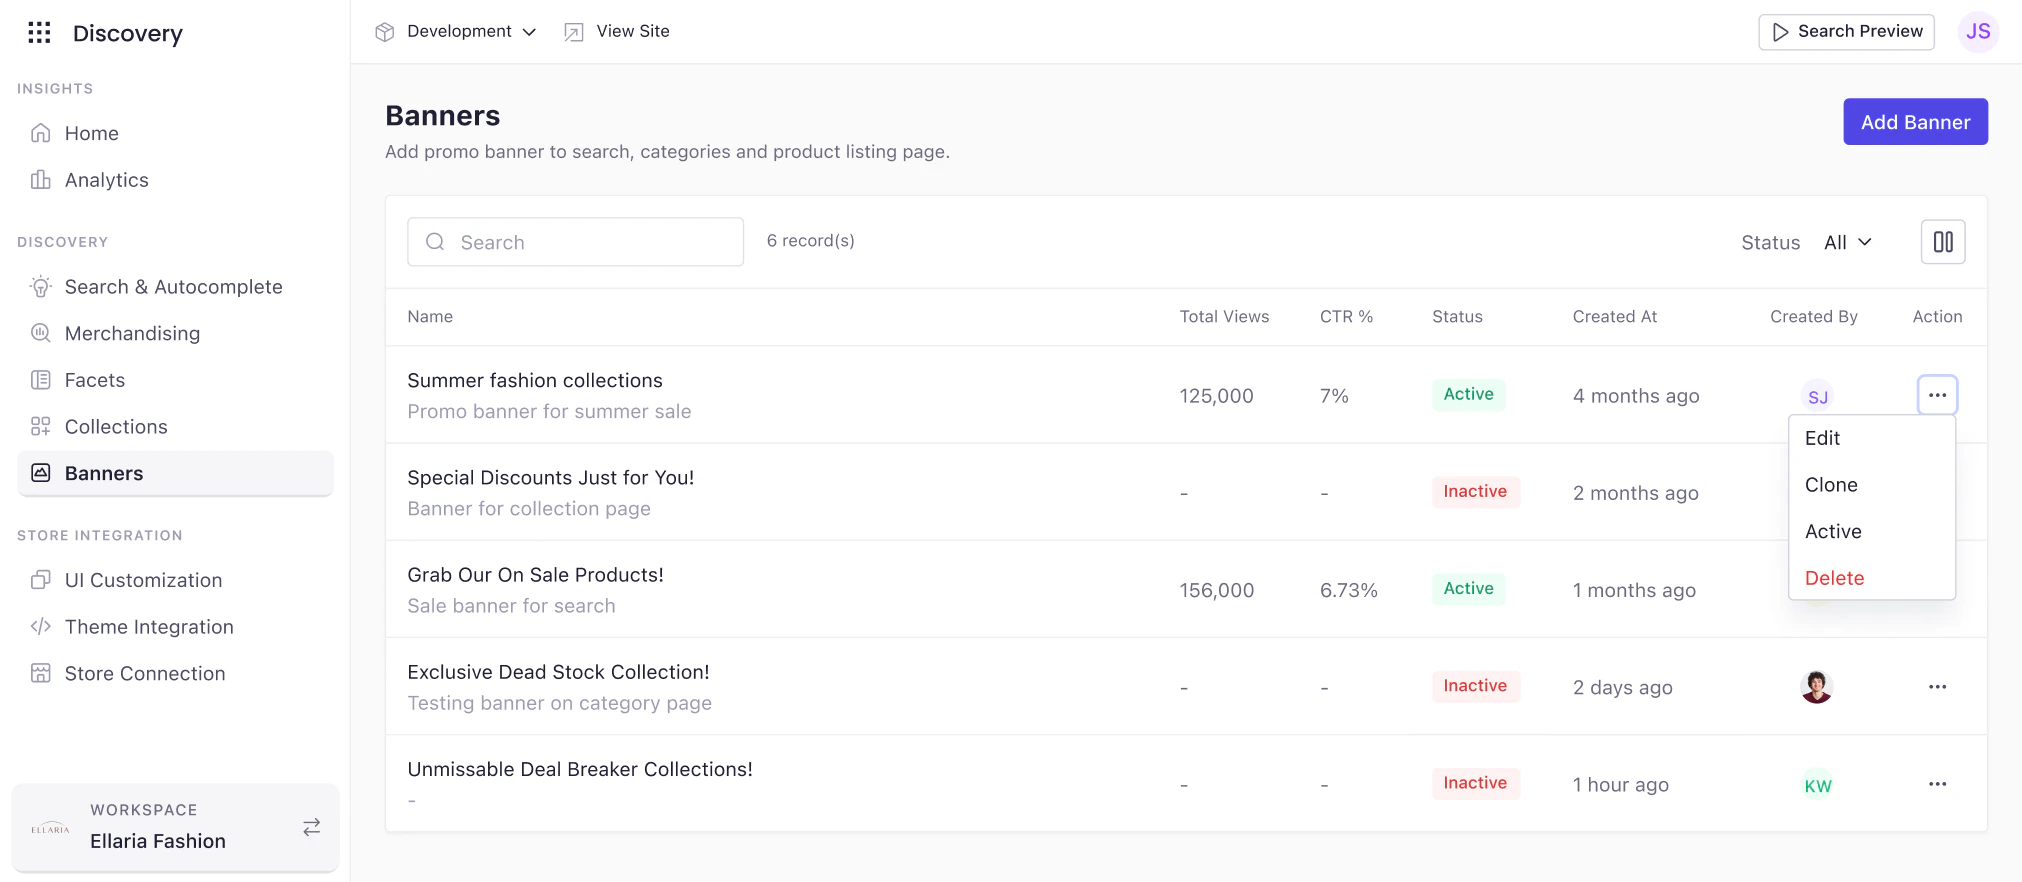
The Banners screen displays all configured banners with the following columns:
| **Field** | **Description** |
| -------------- | ----------------------------------------------------------------------------------------------------------------------------- |
| **Name** | Internal label assigned to the banner. Used to identify it across the dashboard and within Merchandising Rules. |
| **Status** | Indicates whether the banner is Active or Inactive. Only active banners are eligible to display once attached to a live rule. |
| **Created At** | The date the banner was created. |
| **Created By** | The user who created the banner. Useful for team collaboration and audit tracking. |
| **Action** | A menu (···) offering Edit, Clone, Activate/Deactivate, and Delete. |
**Search and Filter**
Use the Search bar to filter banners by name. Use the Status dropdown to filter by Active or Inactive.
**Actions Menu**
Click ··· on any row to access the following actions:
* **Edit** — modify the banner's configuration
*
* **Clone** — duplicate the banner and all settings as a starting point for a new campaign
*
* **Activate / Deactivate** — toggle the banner's active status without deleting it
*
* **Delete** — permanently remove the banner
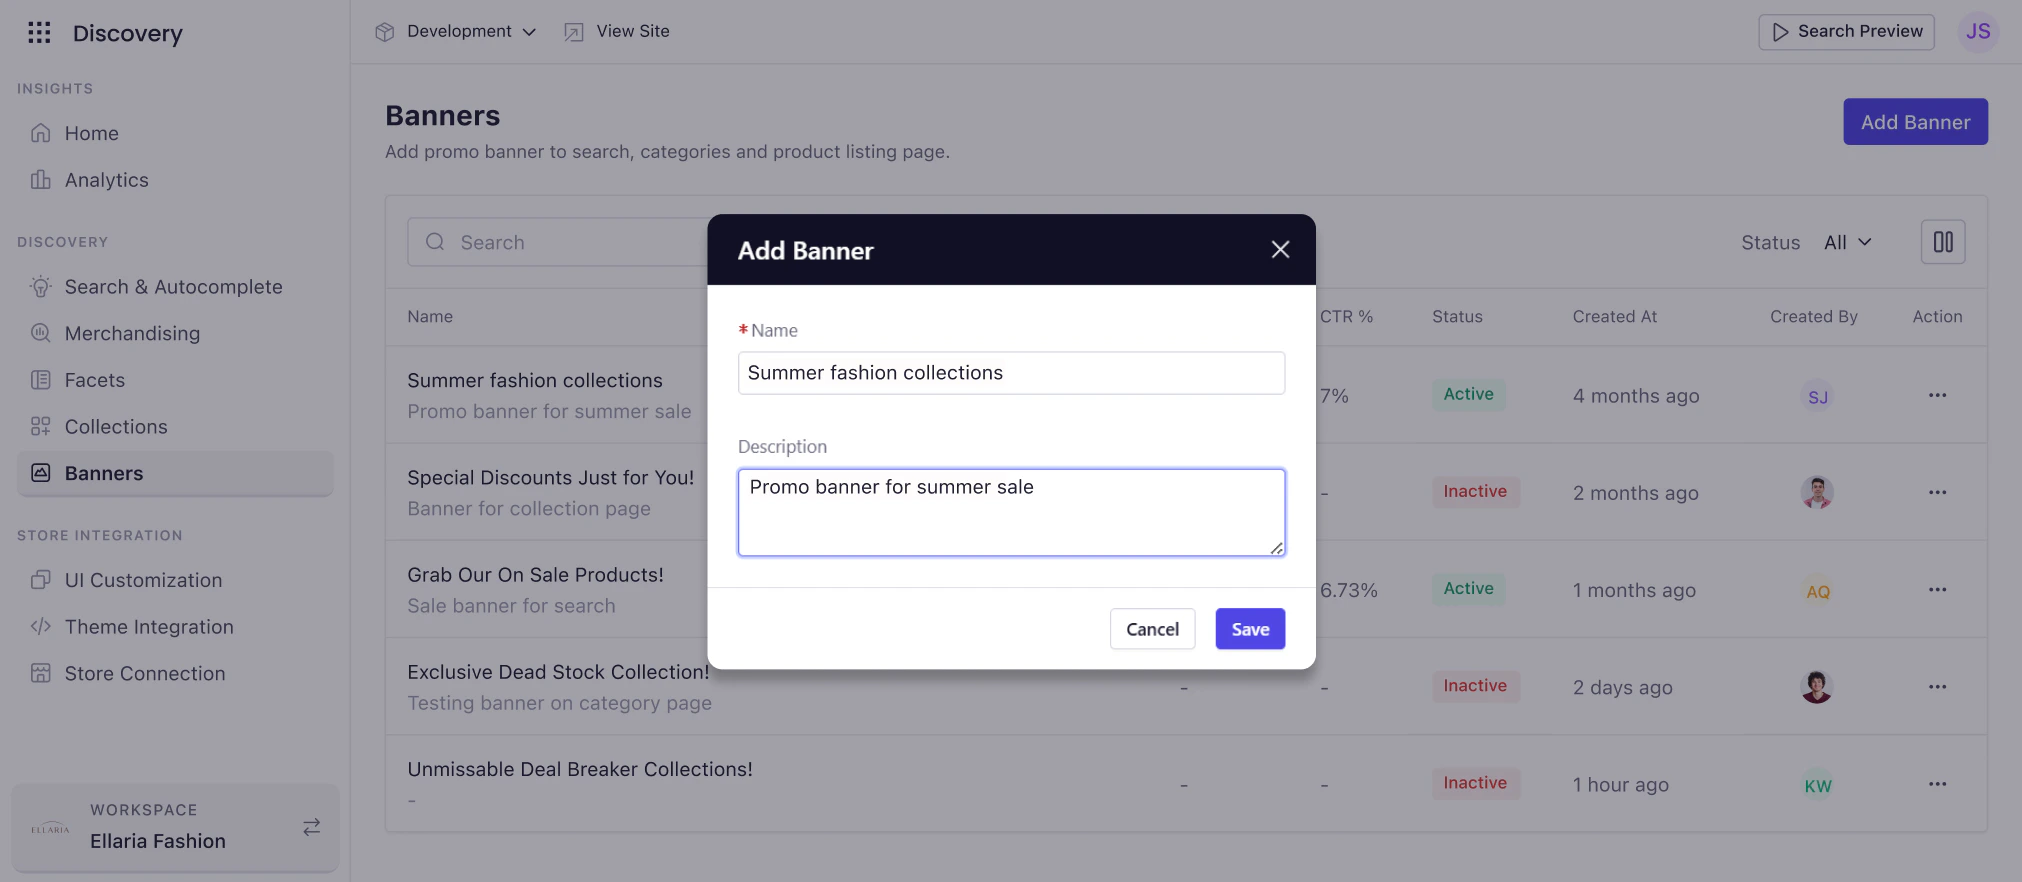
Click **Add Banner** to open the creation modal. Enter the following:
* **Name** (required) — an internal identifier for the banner. Use a naming convention that reflects the campaign and placement, for example: "Summer Sale — Dresses — Search."
* **Description** (optional) — additional context for your team, such as campaign dates or the intended rule.
Click Save. The banner configuration screen will open.
# Configuring Banner
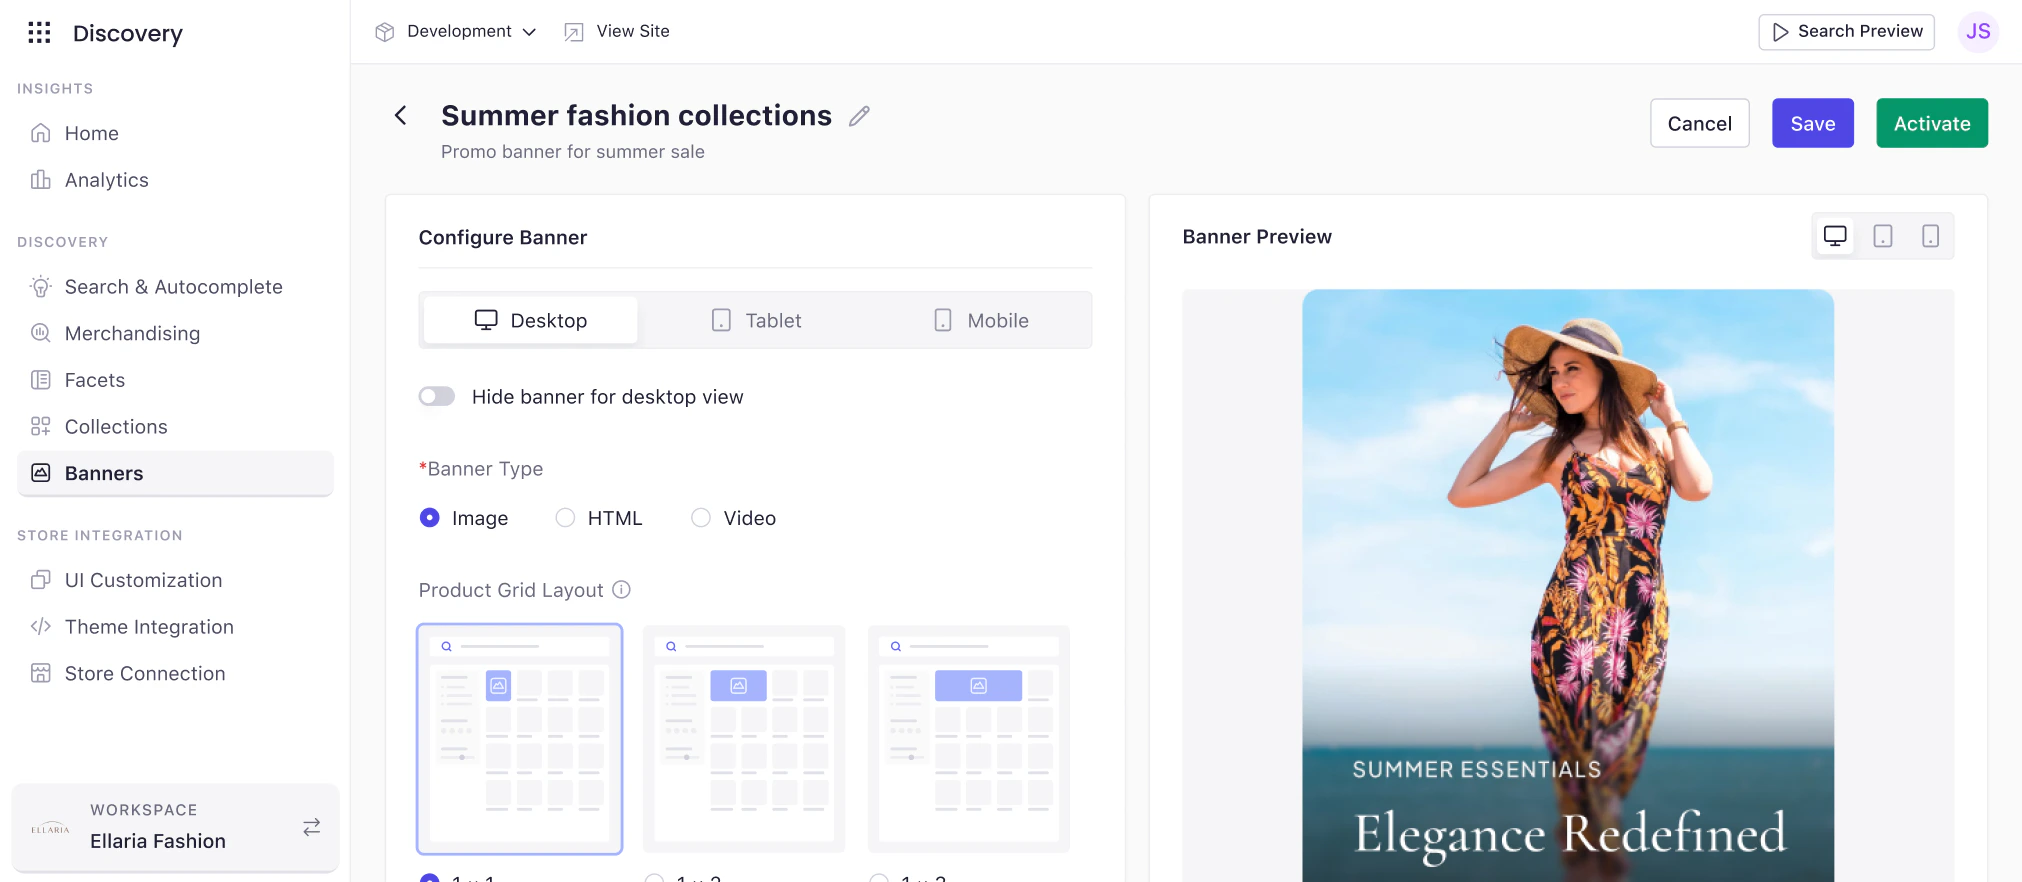
Banners can be configured independently for Desktop, Tablet, and Mobile. Each device tab has its own layout, content, and visibility settings.
To suppress a banner on a specific device, check Hide banner for \[device] view within that device tab.
Configure devices separately when:
* Your banner creative is not responsive across screen widths
* You are using a different image crop or aspect ratio per device
* You want the banner to appear on desktop and tablet but not mobile, or vice versa
Select the content format for this banner:
| **Type** | **Description** |
| --------- | -------------------------------------------------------------------------------------------------------------------------------------------------------------------------- |
| **Image** | Upload a static image (PNG, JPG, AVIF, WEBP, or GIF, up to 2 MB). Standard format for promotional campaigns, seasonal banners, and brand placements. |
| **Video** | Display a video banner. Best for high-production campaigns where motion adds meaningful context. Supports video URLs from platforms like YouTube, Vimeo, Dailymotion, etc. |
| **HTML** | Paste custom HTML for advanced use cases such as countdown timers, dynamic copy, or embedded interactive elements. Requires front-end familiarity. |
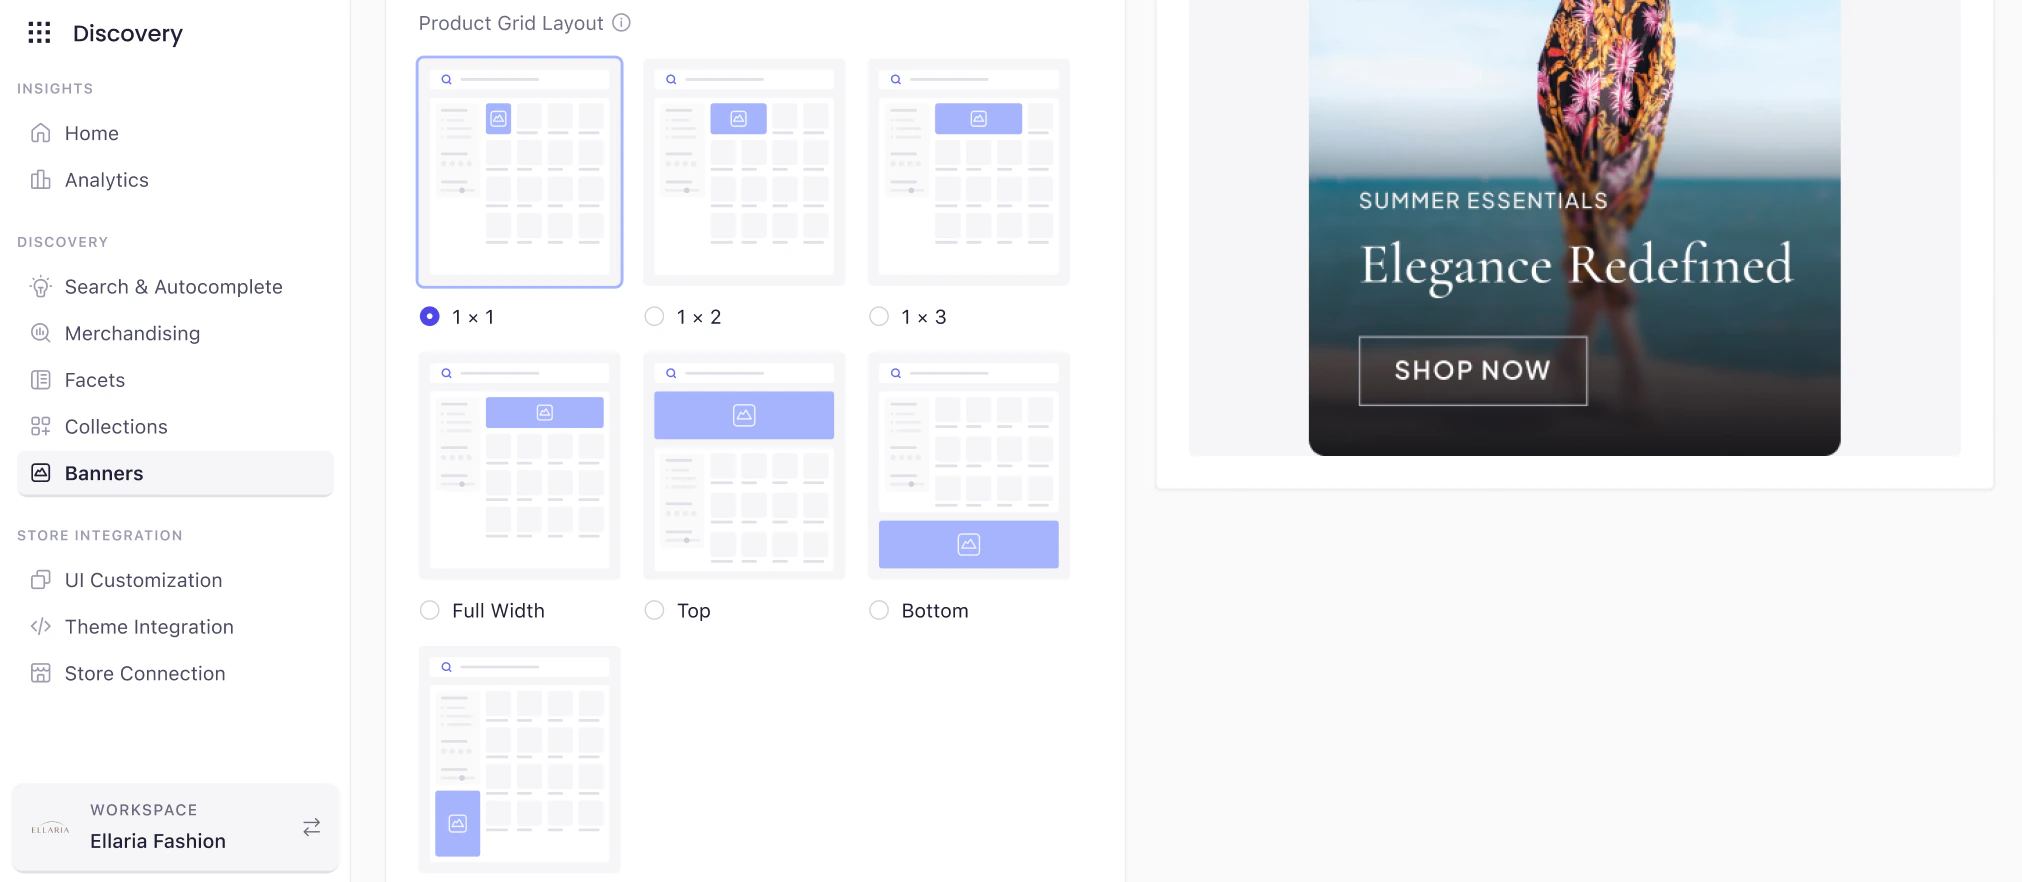
Select where the banner appears relative to products on the page.
| **Layout** | **Where It Appears** |
| --------------- | --------------------------------------------------------------------------------- |
| **1x1** | Inline within the product grid, occupying the same space as a single product tile |
| **1x2** | Spans two product columns in a single row |
| **1x3** | Spans three product columns in a single row |
| **Full Width** | Stretches across the full width of the product grid |
| **Top** | Above all products, before the grid begins |
| **Bottom** | Below all products, after the grid ends |
| **Below Facet** | Between the filter panel and the product grid |
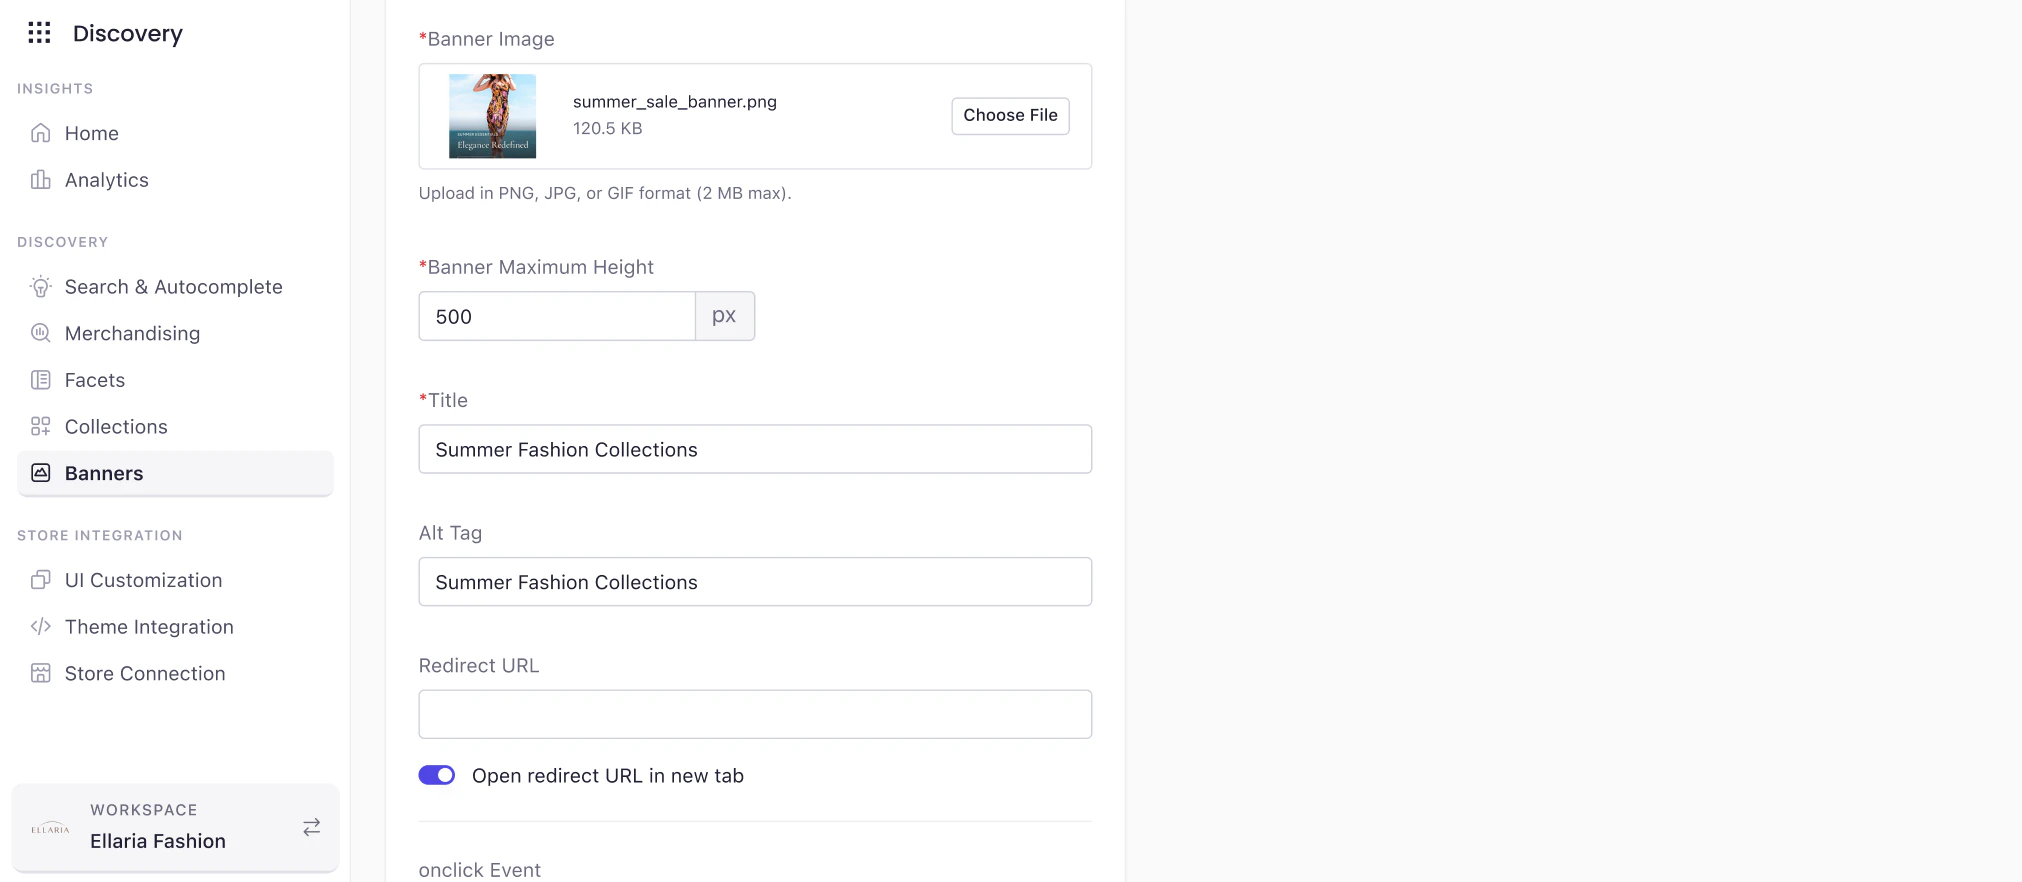
Configure the banner's content and interaction behavior:
| **Field** | **Description** |
| ------------------------- | --------------------------------------------------------------------------------------------------------------------------------------------------------------------------------------------- |
| **Banner Image** | Upload the image file. Supported formats: PNG, JPG, AVIF, WEBP or GIF. Maximum file size: 2 MB. |
| **Title** | An internal title for the banner. Used in some theme implementations as display text. |
| **Banner Maximum Height** | Maximum display height in pixels. Prevents oversized banners from disrupting the product grid layout. |
| **Alt Tag** | Describes the banner image for screen readers and search engines. Required for accessibility. Be specific: "Summer Sale — jewelry up to 30% off" is more effective than "promotional banner." |
| **Redirect URL** | The page a shopper lands on after clicking the banner. Can be a collection page, PLP, external URL, or campaign landing page. |
| **Open in New Tab** | Toggle on to open the destination in a new browser tab. Recommended when linking to external sites. |
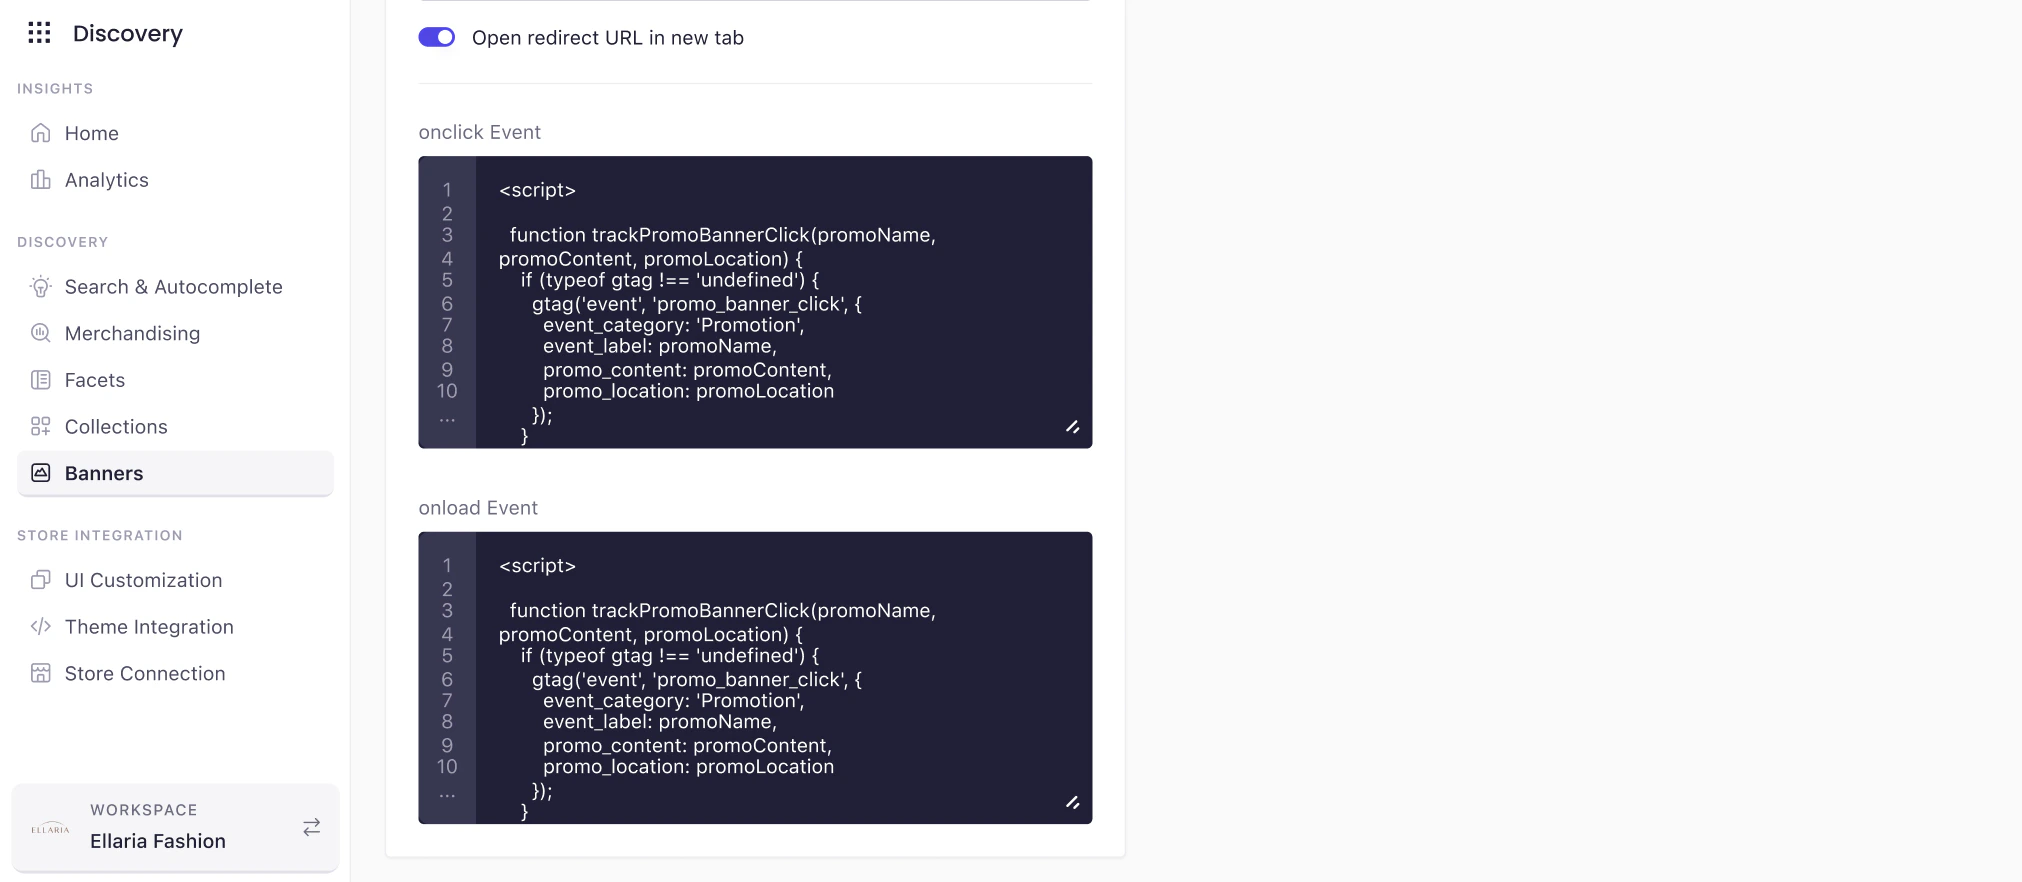
Event tracking connects banner interactions to your analytics stack. Configure JavaScript events to fire when the banner loads or when a shopper clicks it.
| Event | When It Fires | Common Uses |
| ----------- | -------------------------------------- | ------------------------------------------------------------------ |
| **Onload** | When the banner renders in the browser | Track impressions, fire tracking pixels, trigger A/B testing tools |
| **Onclick** | When a shopper clicks the banner | Track CTR, record conversions, send data to retargeting platforms |
To configure, paste your JavaScript event code into the Onload Event or Onclick Event field. Events execute in the browser at the corresponding moment without requiring additional page-level changes.
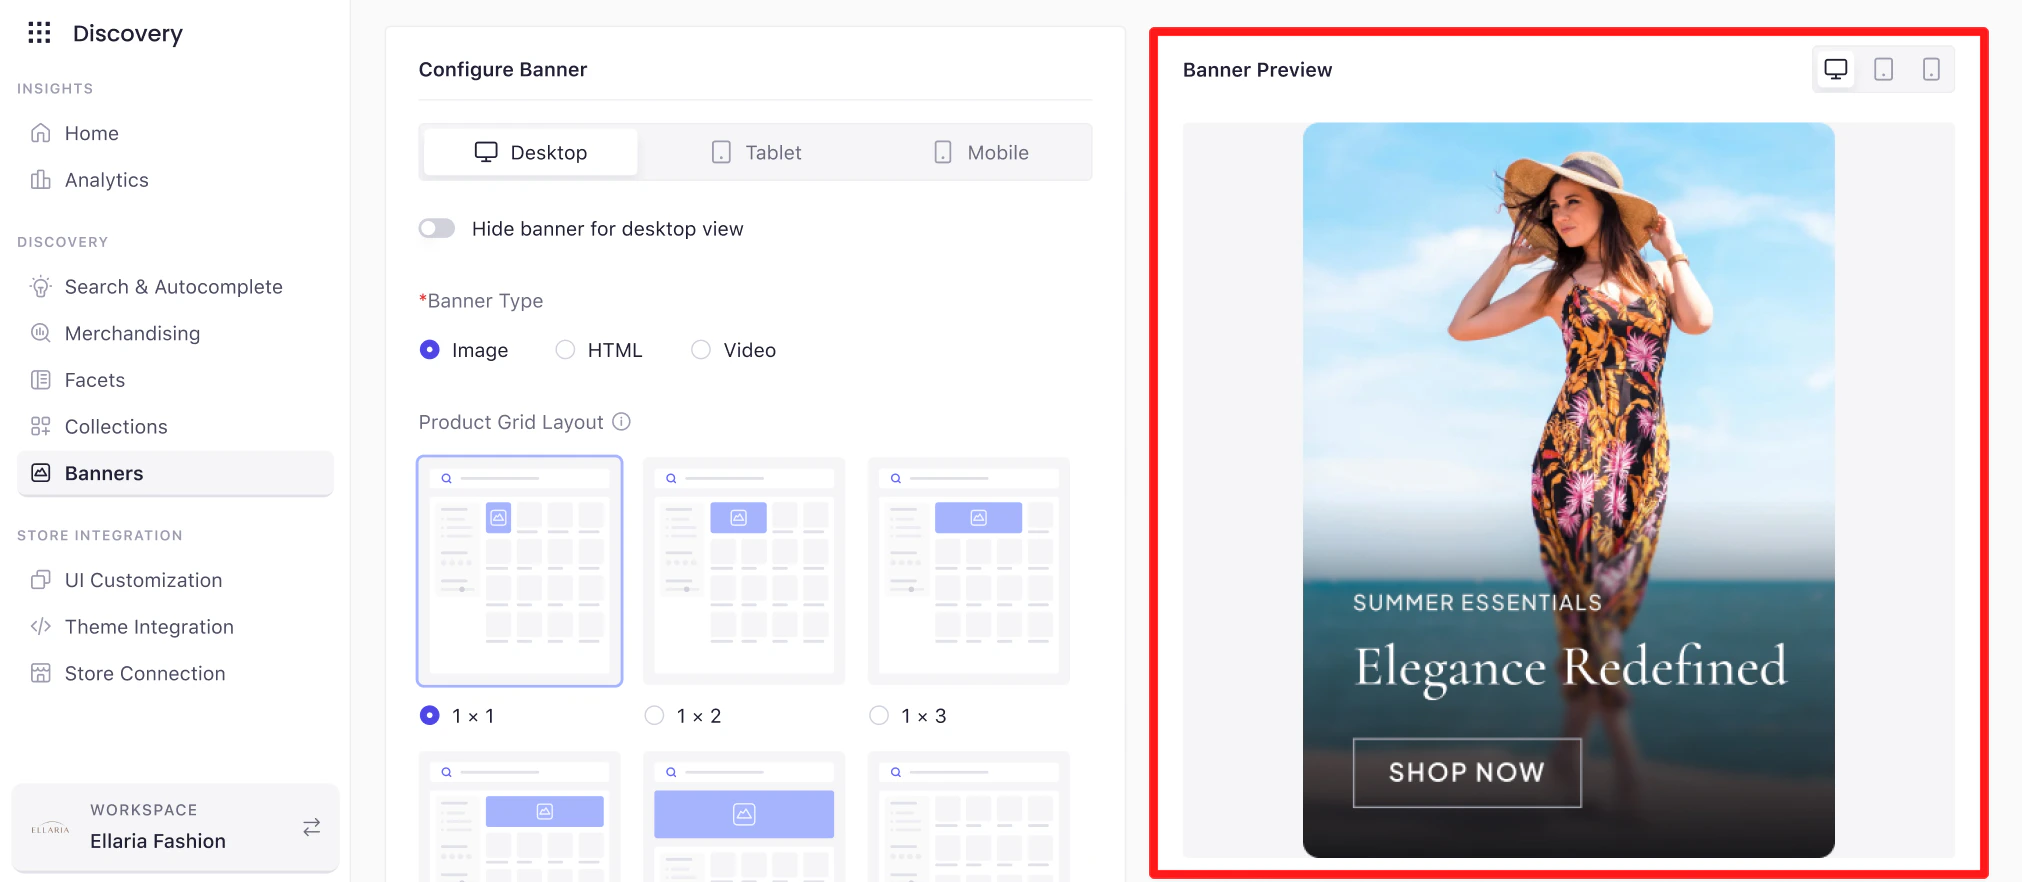
A real-time Banner Preview panel is available on the right side of the configure screen. The preview updates as you make changes to layout and content.
**Note**\
The preview shows only the content and layout, not your storefront’s
actual theme. Final appearance depends on your front-end setup. Always test
new banner types in a staging environment before publishing to
production.{" "}
| **Action** | **What It Does** |
| ------------ | -------------------------------------------------------------------------------------------------------------- |
| **Save** | Stores configuration changes. The banner is saved but not displayed on the storefront. |
| **Activate** | Marks the banner as active. Active banners are eligible to display once attached to a live Merchandising Rule. |
| **Cancel** | Discards unsaved changes. |
**Important**\
Activating a banner does not make it visible on your
storefront. A banner only appears once it is attached to an active
Merchandising Rule.
See how to **Add Banners** to **Merchandising Rules**
here. Visit [**AI Merchandising → Type of Rules → Banner
Rule**](/experro_discovery/merchandising/rule_types/banner_rule) for
step-by-step setup instructions.
 Click **Add Banner** to open the creation modal. Enter the following:
* **Name** (required) — an internal identifier for the banner. Use a naming convention that reflects the campaign and placement, for example: "Summer Sale — Dresses — Search."
* **Description** (optional) — additional context for your team, such as campaign dates or the intended rule.
Click Save. The banner configuration screen will open.
Click **Add Banner** to open the creation modal. Enter the following:
* **Name** (required) — an internal identifier for the banner. Use a naming convention that reflects the campaign and placement, for example: "Summer Sale — Dresses — Search."
* **Description** (optional) — additional context for your team, such as campaign dates or the intended rule.
Click Save. The banner configuration screen will open.
 Select the content format for this banner:
| **Type** | **Description** |
| --------- | -------------------------------------------------------------------------------------------------------------------------------------------------------------------------- |
| **Image** | Upload a static image (PNG, JPG, AVIF, WEBP, or GIF, up to 2 MB). Standard format for promotional campaigns, seasonal banners, and brand placements. |
| **Video** | Display a video banner. Best for high-production campaigns where motion adds meaningful context. Supports video URLs from platforms like YouTube, Vimeo, Dailymotion, etc. |
| **HTML** | Paste custom HTML for advanced use cases such as countdown timers, dynamic copy, or embedded interactive elements. Requires front-end familiarity. |
Select the content format for this banner:
| **Type** | **Description** |
| --------- | -------------------------------------------------------------------------------------------------------------------------------------------------------------------------- |
| **Image** | Upload a static image (PNG, JPG, AVIF, WEBP, or GIF, up to 2 MB). Standard format for promotional campaigns, seasonal banners, and brand placements. |
| **Video** | Display a video banner. Best for high-production campaigns where motion adds meaningful context. Supports video URLs from platforms like YouTube, Vimeo, Dailymotion, etc. |
| **HTML** | Paste custom HTML for advanced use cases such as countdown timers, dynamic copy, or embedded interactive elements. Requires front-end familiarity. |
 Select where the banner appears relative to products on the page.
| **Layout** | **Where It Appears** |
| --------------- | --------------------------------------------------------------------------------- |
| **1x1** | Inline within the product grid, occupying the same space as a single product tile |
| **1x2** | Spans two product columns in a single row |
| **1x3** | Spans three product columns in a single row |
| **Full Width** | Stretches across the full width of the product grid |
| **Top** | Above all products, before the grid begins |
| **Bottom** | Below all products, after the grid ends |
| **Below Facet** | Between the filter panel and the product grid |
Select where the banner appears relative to products on the page.
| **Layout** | **Where It Appears** |
| --------------- | --------------------------------------------------------------------------------- |
| **1x1** | Inline within the product grid, occupying the same space as a single product tile |
| **1x2** | Spans two product columns in a single row |
| **1x3** | Spans three product columns in a single row |
| **Full Width** | Stretches across the full width of the product grid |
| **Top** | Above all products, before the grid begins |
| **Bottom** | Below all products, after the grid ends |
| **Below Facet** | Between the filter panel and the product grid |
 Configure the banner's content and interaction behavior:
| **Field** | **Description** |
| ------------------------- | --------------------------------------------------------------------------------------------------------------------------------------------------------------------------------------------- |
| **Banner Image** | Upload the image file. Supported formats: PNG, JPG, AVIF, WEBP or GIF. Maximum file size: 2 MB. |
| **Title** | An internal title for the banner. Used in some theme implementations as display text. |
| **Banner Maximum Height** | Maximum display height in pixels. Prevents oversized banners from disrupting the product grid layout. |
| **Alt Tag** | Describes the banner image for screen readers and search engines. Required for accessibility. Be specific: "Summer Sale — jewelry up to 30% off" is more effective than "promotional banner." |
| **Redirect URL** | The page a shopper lands on after clicking the banner. Can be a collection page, PLP, external URL, or campaign landing page. |
| **Open in New Tab** | Toggle on to open the destination in a new browser tab. Recommended when linking to external sites. |
Configure the banner's content and interaction behavior:
| **Field** | **Description** |
| ------------------------- | --------------------------------------------------------------------------------------------------------------------------------------------------------------------------------------------- |
| **Banner Image** | Upload the image file. Supported formats: PNG, JPG, AVIF, WEBP or GIF. Maximum file size: 2 MB. |
| **Title** | An internal title for the banner. Used in some theme implementations as display text. |
| **Banner Maximum Height** | Maximum display height in pixels. Prevents oversized banners from disrupting the product grid layout. |
| **Alt Tag** | Describes the banner image for screen readers and search engines. Required for accessibility. Be specific: "Summer Sale — jewelry up to 30% off" is more effective than "promotional banner." |
| **Redirect URL** | The page a shopper lands on after clicking the banner. Can be a collection page, PLP, external URL, or campaign landing page. |
| **Open in New Tab** | Toggle on to open the destination in a new browser tab. Recommended when linking to external sites. |
 | Event | When It Fires | Common Uses |
| ----------- | -------------------------------------- | ------------------------------------------------------------------ |
| **Onload** | When the banner renders in the browser | Track impressions, fire tracking pixels, trigger A/B testing tools |
| **Onclick** | When a shopper clicks the banner | Track CTR, record conversions, send data to retargeting platforms |
To configure, paste your JavaScript event code into the Onload Event or Onclick Event field. Events execute in the browser at the corresponding moment without requiring additional page-level changes.
| Event | When It Fires | Common Uses |
| ----------- | -------------------------------------- | ------------------------------------------------------------------ |
| **Onload** | When the banner renders in the browser | Track impressions, fire tracking pixels, trigger A/B testing tools |
| **Onclick** | When a shopper clicks the banner | Track CTR, record conversions, send data to retargeting platforms |
To configure, paste your JavaScript event code into the Onload Event or Onclick Event field. Events execute in the browser at the corresponding moment without requiring additional page-level changes.