> ## Documentation Index
> Fetch the complete documentation index at: https://help.experro.com/llms.txt
> Use this file to discover all available pages before exploring further.
# Collections
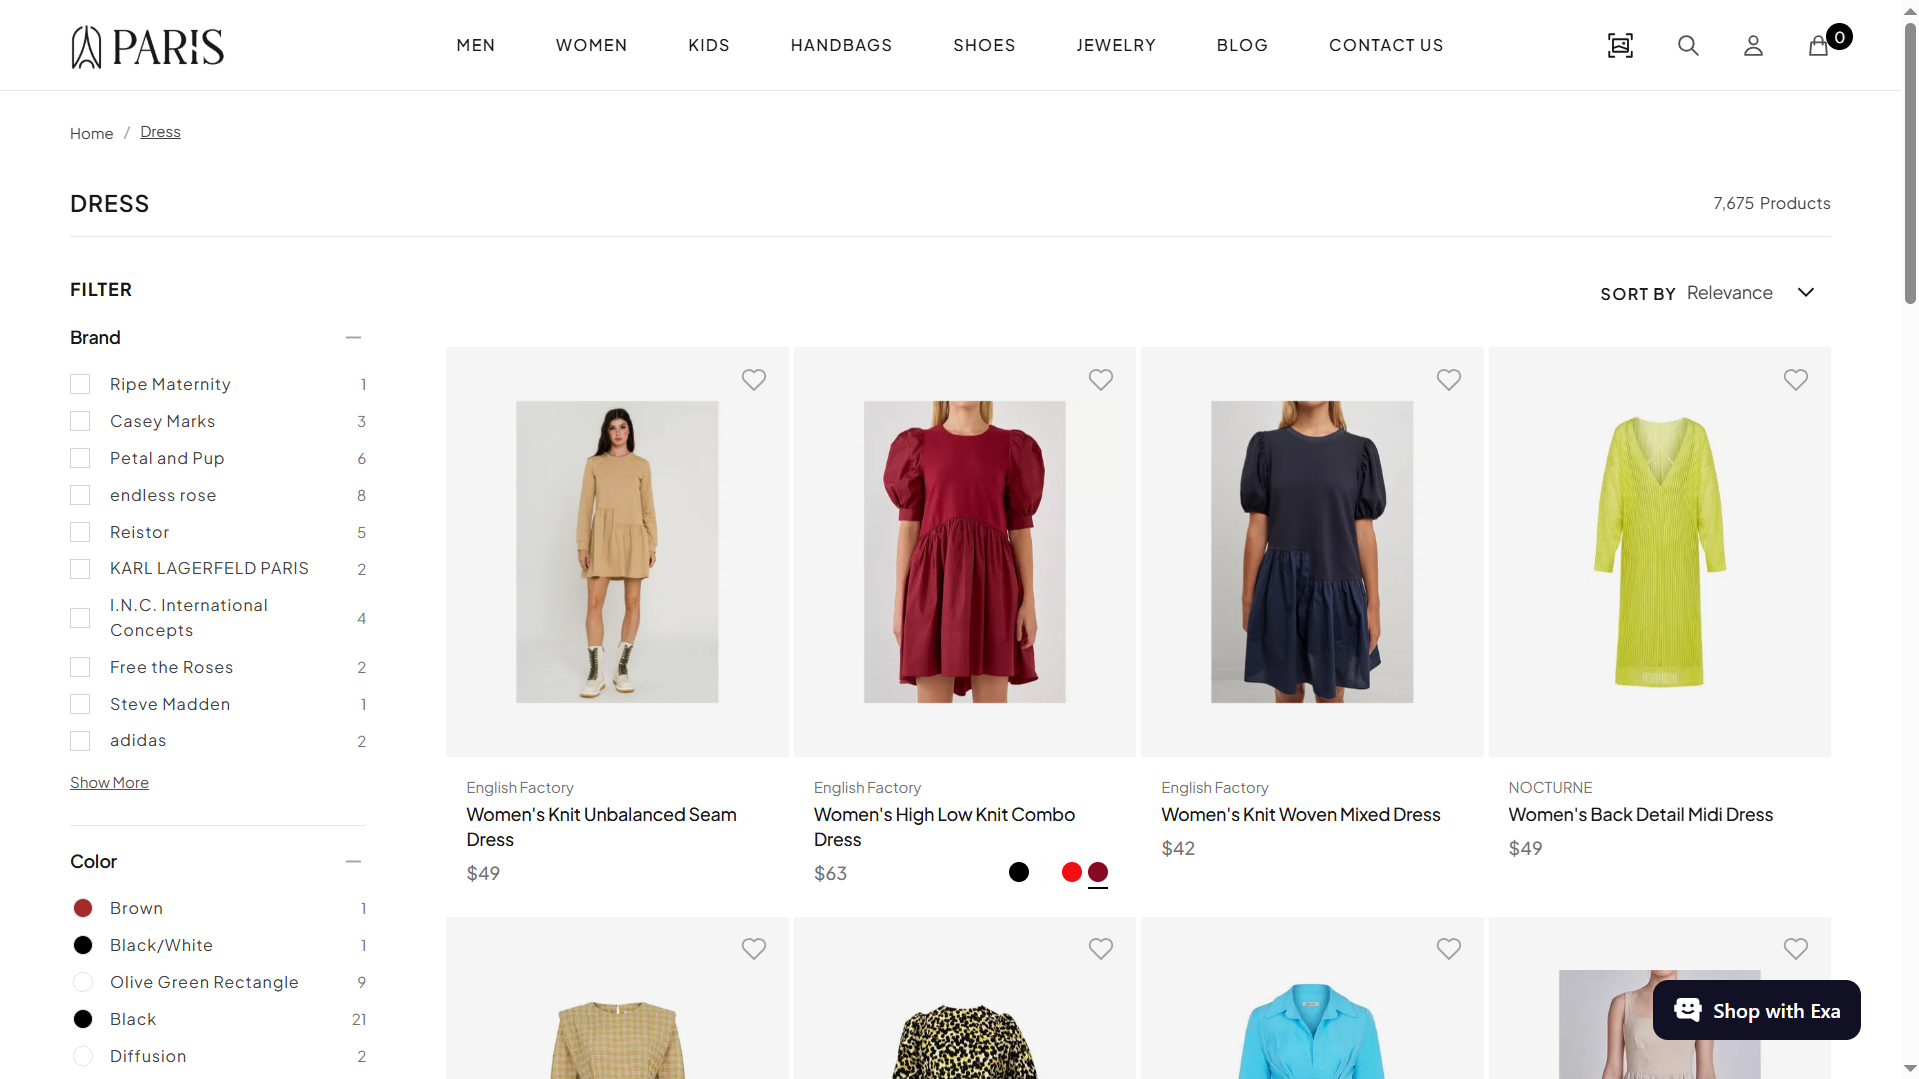
Experro **Collections** empowers merchants to curate and showcase hand-picked groups of products—whether seasonal bundles, thematic assortments, or promotional sets—directly within search results, category pages, and recommendation slots.
By blending AI-driven discovery with human curation, Collections transforms your storefront into a dynamic, story-driven journey that boosts engagement and average order value—all without writing a single line of code.
 ## Navigation
Select
## Navigation
Select  at the top left of the application. Next, select **Discovery** from the dropdown menu. The discovery screen will be displayed. Navigate to **Collections** from the navigation panel.
 ## Collections List View
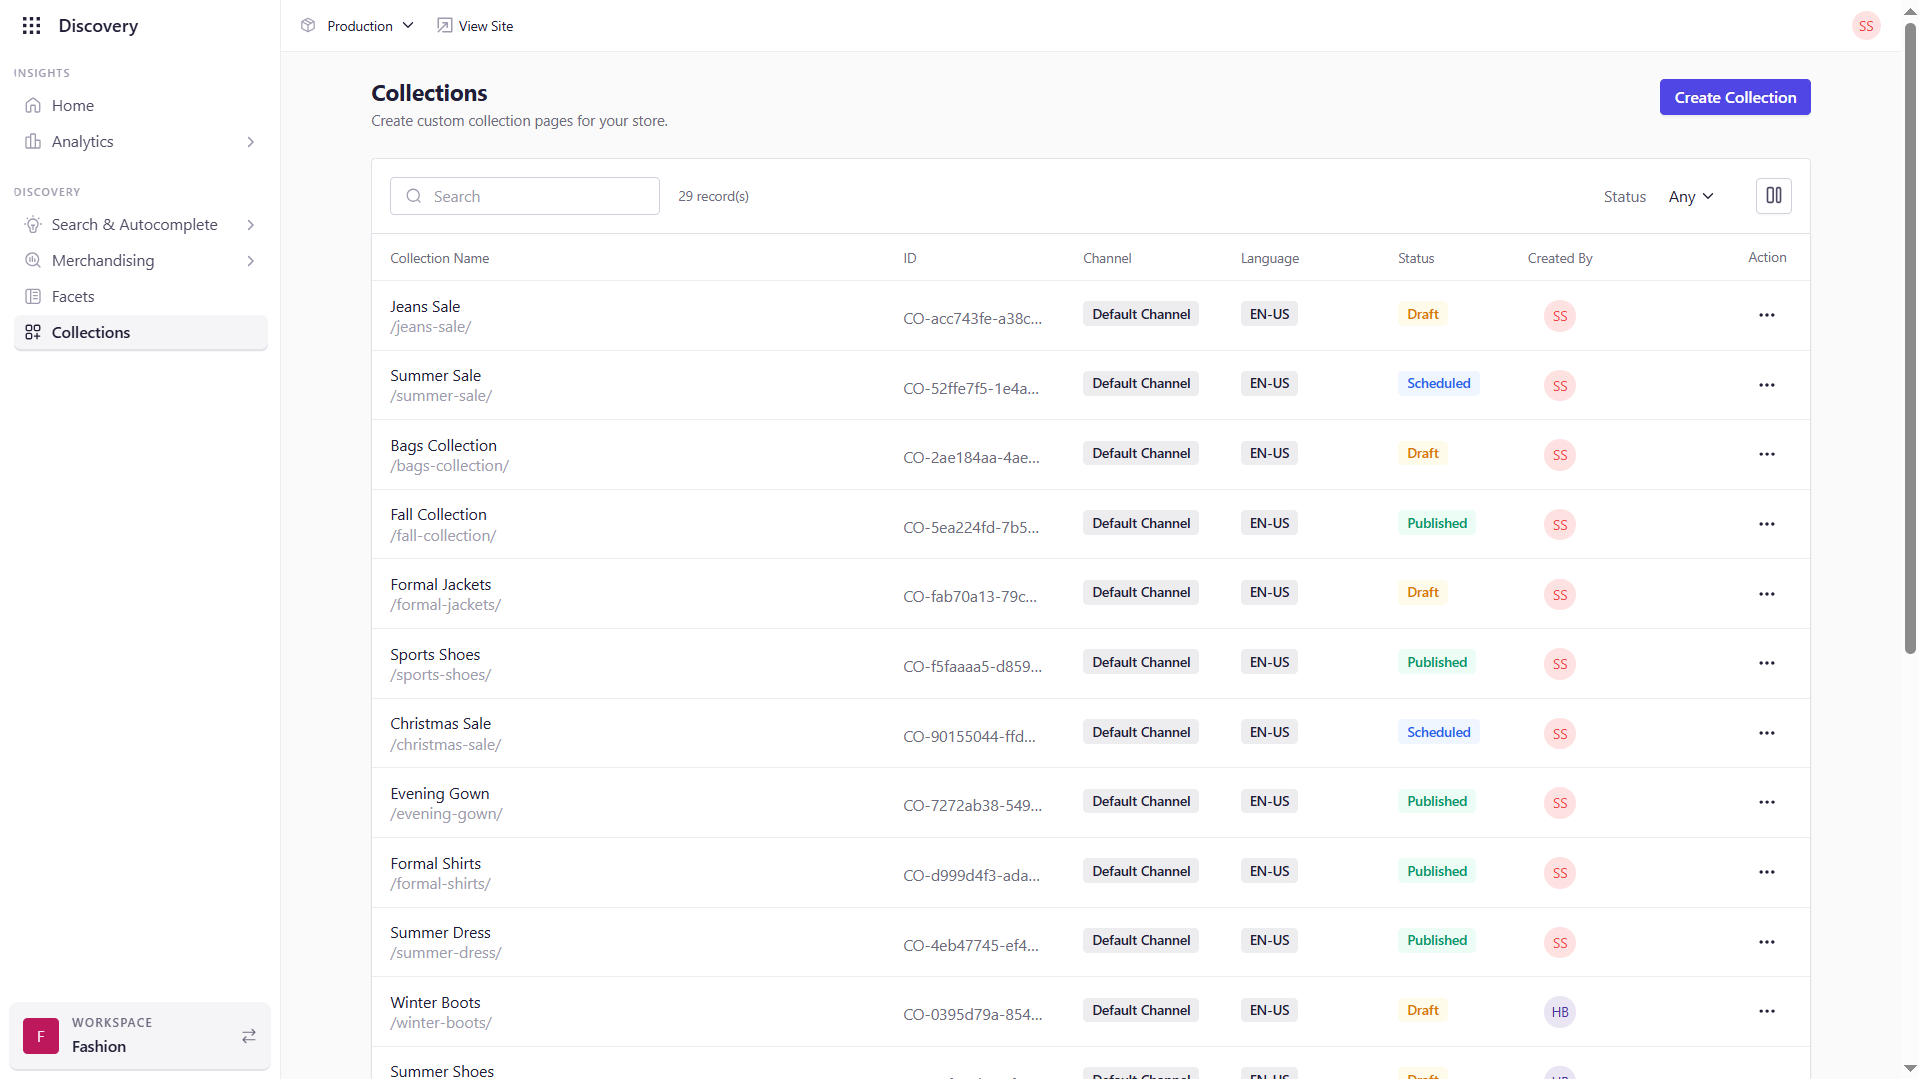
On the **Collections** screen you’ll see a table of all existing collections, with the following columns:
| Field | Description |
| ------------------- | --------------------------------------------------------------------------------------------------------------------------------------------------------------------------------- |
| **Collection Name** | The human-readable title you’ve assigned to the collection. This helps you and your team quickly identify the grouping of products (e.g., “Spring Promotions” or “Men’s Shoes”). |
| **ID** | A unique system-generated identifier for the collection. Use this when referring to the collection in API calls or support tickets. |
| **Channel** | The channel where this collection is active. |
| **Language** | The locale or language version (e.g., “en-US,” “fr-FR”) of the collection. Displayed only if you support multiple languages. |
| **Status** | Indicates whether the collection is currently **Published**, **Draft**, or **Scheduled**. Helps you see at a glance which collections are live. |
| **Created By** | The username or email of the administrator who originally created the collection. Useful for audit trails and collaboration. |
| **Action** | A menu (⋯) offering contextual operations such as **Edit**, **Clone**, **Publish/Unpublish**, or **Delete**. |
### Search Bar
* Use the search bar to filter by collection name or ID.
### Actions Menu
* Click under **Action** on any row to:
* **Edit** : Edit the Collection
* **Publish/Unpublish** : Publish/Unpublish the Collection
* **Clone** : Clone the Collection
* **Delete**: Delete the Collection
## Create New Collection
You can create your own collection and then add curated products to the collection. Let us look into the process for the same.
Click **Create Collection** to open the creation dialog.
## Collections List View
On the **Collections** screen you’ll see a table of all existing collections, with the following columns:
| Field | Description |
| ------------------- | --------------------------------------------------------------------------------------------------------------------------------------------------------------------------------- |
| **Collection Name** | The human-readable title you’ve assigned to the collection. This helps you and your team quickly identify the grouping of products (e.g., “Spring Promotions” or “Men’s Shoes”). |
| **ID** | A unique system-generated identifier for the collection. Use this when referring to the collection in API calls or support tickets. |
| **Channel** | The channel where this collection is active. |
| **Language** | The locale or language version (e.g., “en-US,” “fr-FR”) of the collection. Displayed only if you support multiple languages. |
| **Status** | Indicates whether the collection is currently **Published**, **Draft**, or **Scheduled**. Helps you see at a glance which collections are live. |
| **Created By** | The username or email of the administrator who originally created the collection. Useful for audit trails and collaboration. |
| **Action** | A menu (⋯) offering contextual operations such as **Edit**, **Clone**, **Publish/Unpublish**, or **Delete**. |
### Search Bar
* Use the search bar to filter by collection name or ID.
### Actions Menu
* Click under **Action** on any row to:
* **Edit** : Edit the Collection
* **Publish/Unpublish** : Publish/Unpublish the Collection
* **Clone** : Clone the Collection
* **Delete**: Delete the Collection
## Create New Collection
You can create your own collection and then add curated products to the collection. Let us look into the process for the same.
Click **Create Collection** to open the creation dialog.
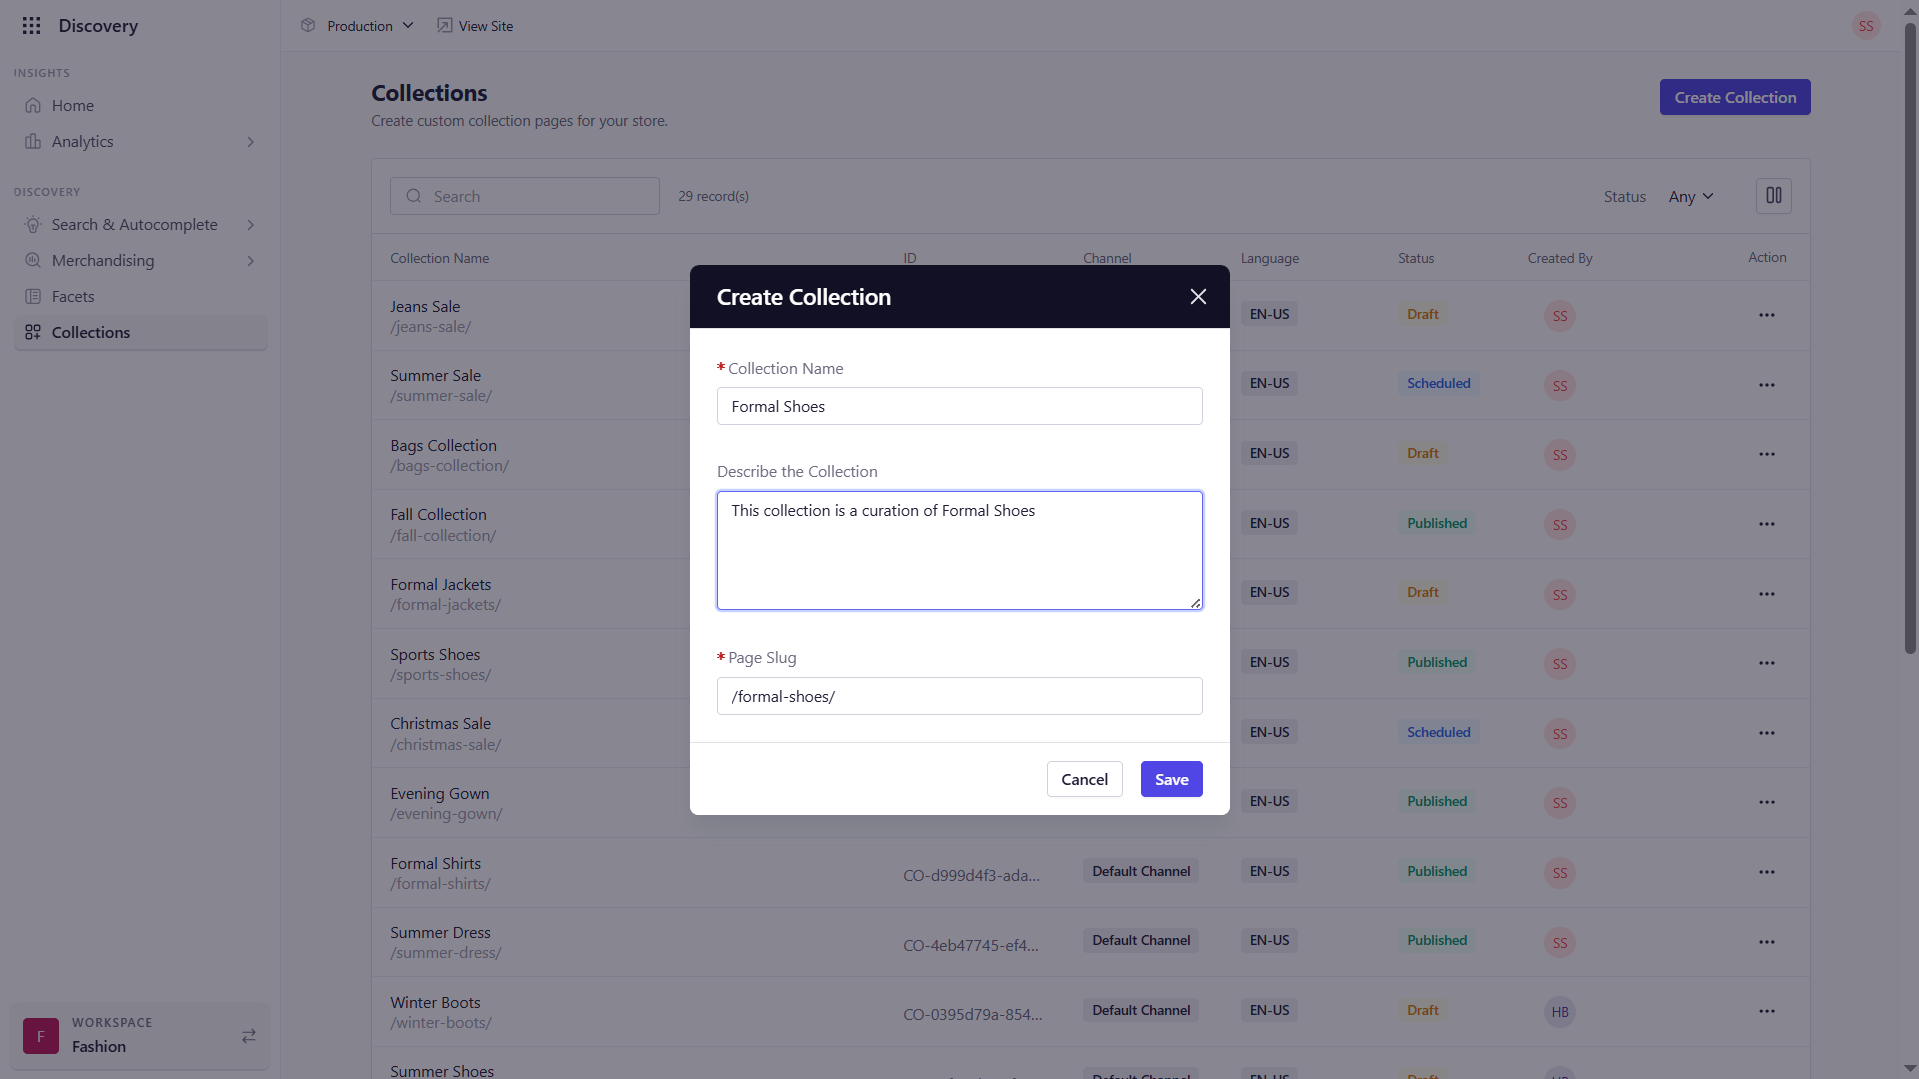 Provide details such as a **Collection Name**, and a description of the collection under **Describe the Collection** and a **Page Slug** will be automatically generated for you.
Click **Save** to create the collection and move to the collection configuration screen.
Provide details such as a **Collection Name**, and a description of the collection under **Describe the Collection** and a **Page Slug** will be automatically generated for you.
Click **Save** to create the collection and move to the collection configuration screen.
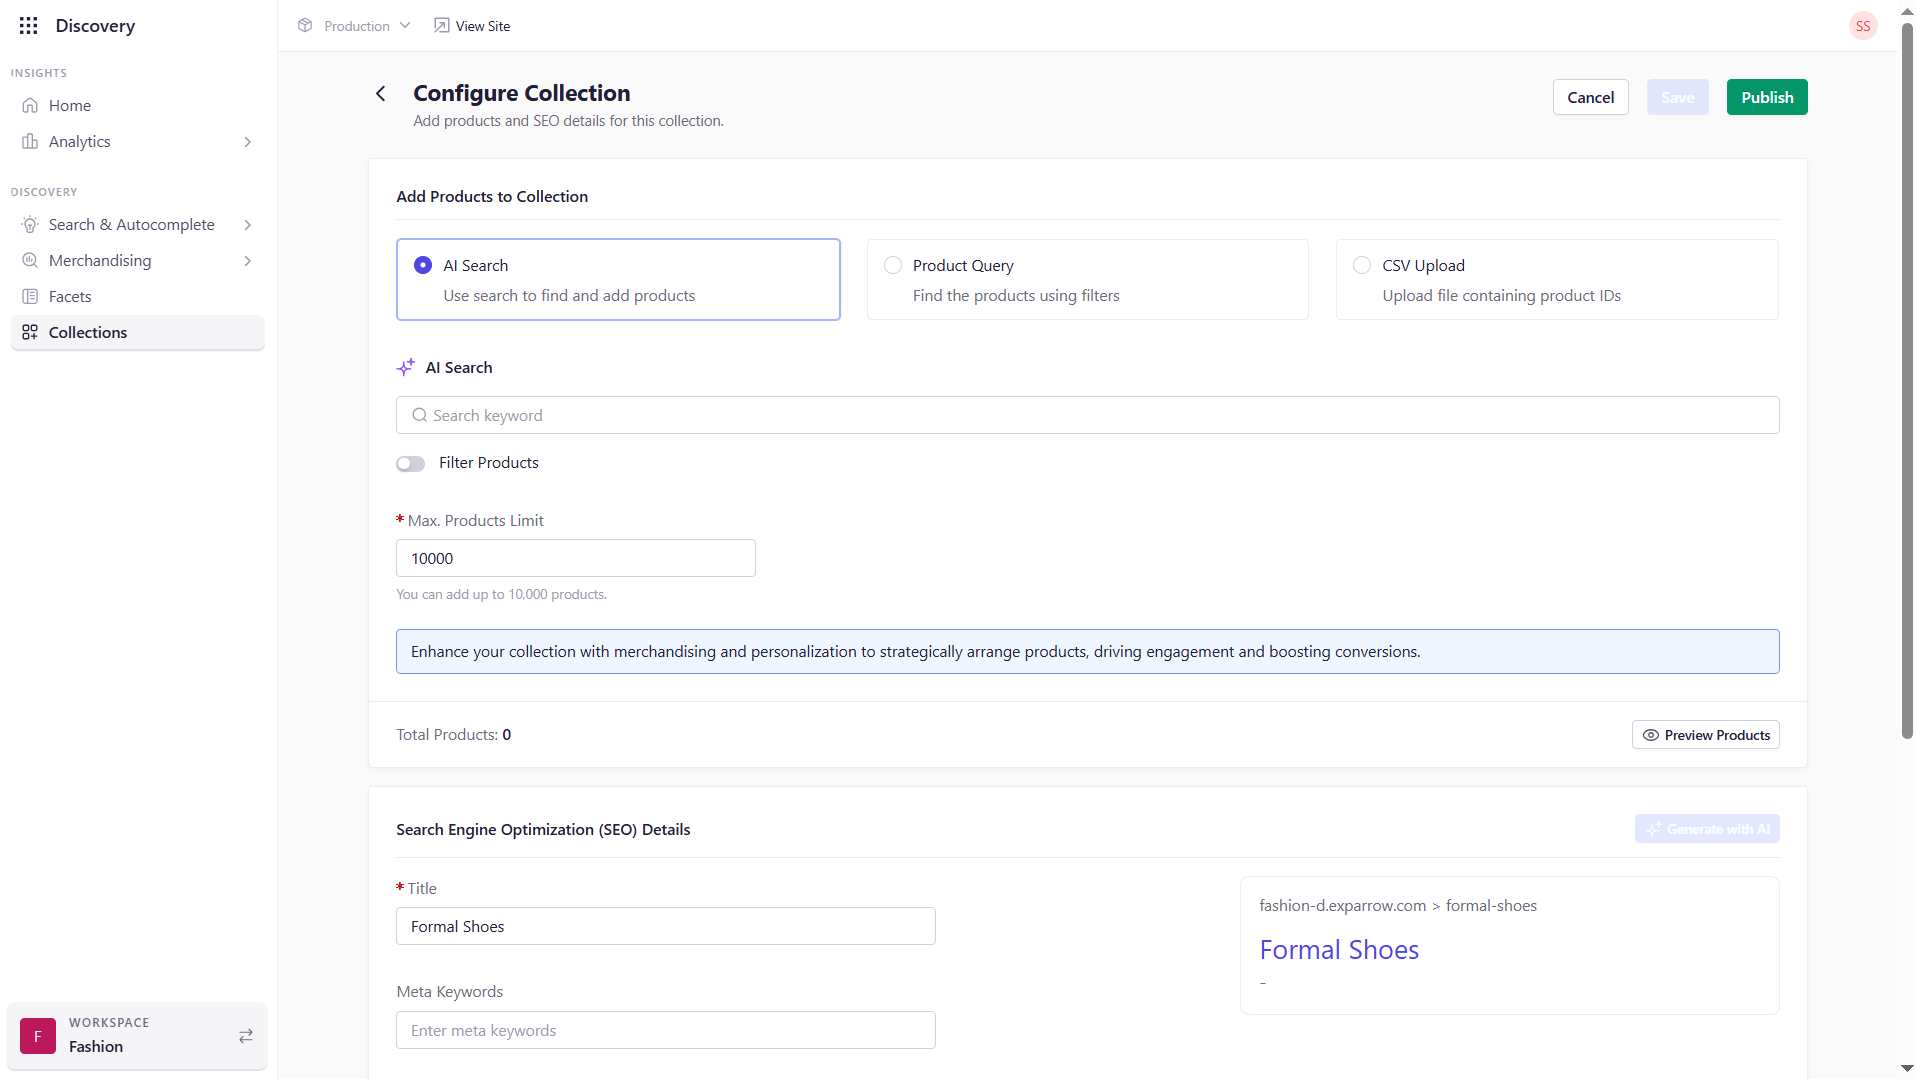 On this screen, you can configure the products that you want to curate for this collection.
### 1. Add Products to Collection
Choose one of the three following methods to **Add Products to Collection**:
On this screen, you can configure the products that you want to curate for this collection.
### 1. Add Products to Collection
Choose one of the three following methods to **Add Products to Collection**:
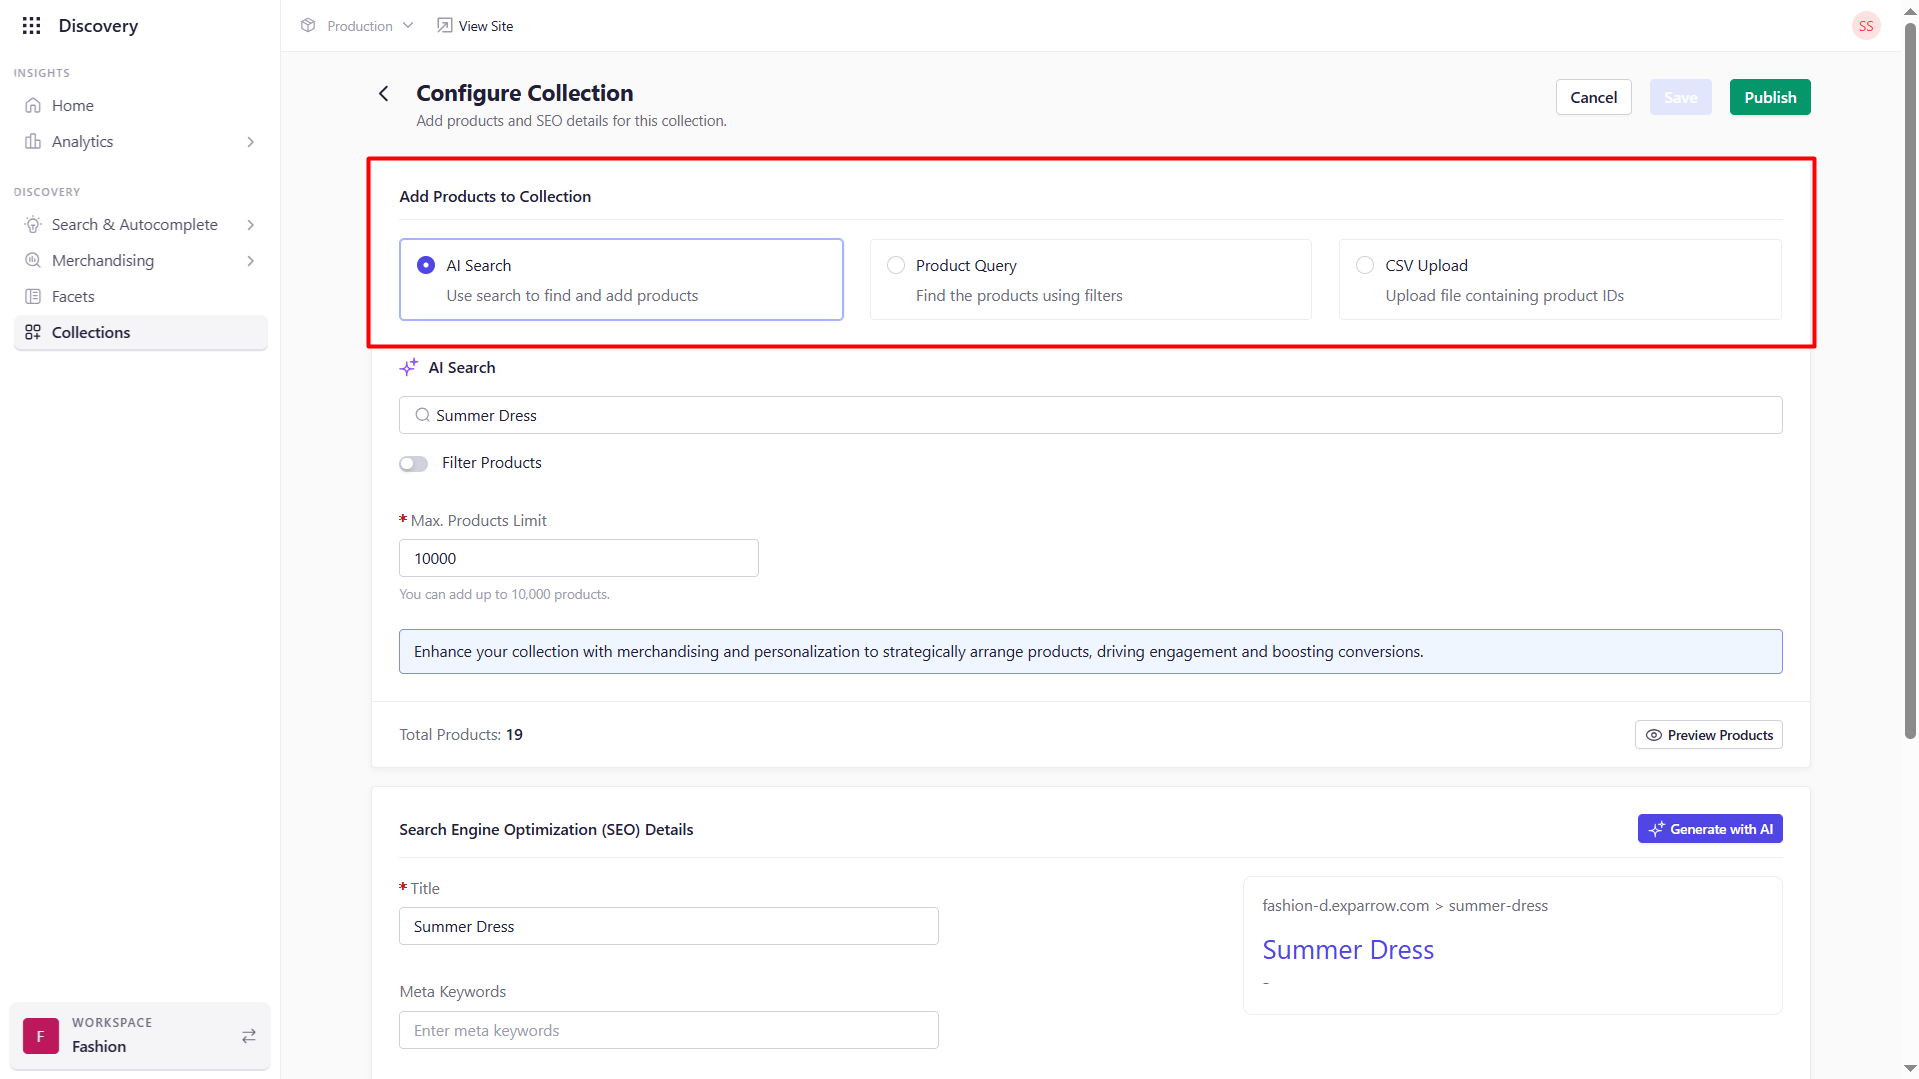 1. **AI Search** : Leverage Experro’s AI-powered discovery to find products by relevance and context.
* **AI Search:** Provide the keyword that you want to curate the products using Experro's AI-powered search.
* **Filter Products:** Use this toggle button to filter products using advanced query building with attributes such as brand, price range, inventory status, etc,.
* **Max. Products Limit:** Specify the maximum number of products that you want to add to this collection. The maximum number that you can specify is 10,000 items per collection.
* **Total Products:** Live count of items matching your criteria.
* **Preview Products:** Click to view a paginated sample before saving.
2. **Product Query**: Create filter-based queries for precise control over collection membership.
* **Product Query:** Select **Product Query** to add products to the collection by building a query.
* **Configure Product Query:** Choose any combination of attributes to build a query (e.g., category = “Shoes” AND in\_stock = true).
* **Max. Products Limit:** Specify the maximum number of products that you want to add to this collection. The maximum number that you can specify is 10,000 items per collection.
* **Total Products:** Live count of items matching your criteria.
* **Preview Products:** Verify your query logic by previewing a subset.
3. **CSV Upload**: Bulk-upload product IDs from your own system or spreadsheet.
* **Select CSV Upload:** Select **CSV Upload** to add products to the collection by building a query.
* **Choose File:** Import a CSV containing product IDs. You can download the sample file to understand how the csv file needs to be created.
* **Max. Records:** 10,000 rows per file.
* **Download Sample:** Get a template to ensure correct formatting.
* **Total Products:** Shows how many valid IDs were imported.
* **Preview Products:** Confirm the imported items before finalizing.
### 2. SEO Details
Optimize how your collection appears in search engines and social shares:
* **Title:** The page’s `` tag (e.g., “Spring Essentials Collection”).
* **Meta Keywords:** Comma-separated keywords for SEO (e.g., “spring fashion, linen dresses”).
* **Meta Description:** A concise summary to display under your title in search results.
* **OG Image:** Upload a 1200×630-px image (PNG or JPG, ≤2 MB) for social previews.
### 3. Collection Page Content
Enhance each collection page with rich content zones:
* **Top of Page Content:** Add banners, hero text, or featured product modules above the product grid.
* **Bottom of Page Content:** Insert FAQs, promotional banners, or related links below the products.
Use the rich-text editor to format headings, lists, images, and embeds. Each block can include dynamic tags (e.g., `{collection_name}`) to personalize the content.
### 4. Publishing Your Collection
Once your products, SEO metadata, and content blocks are configured:
1. **Save Draft:** Click **Save** to preserve changes.
2. **Review Preview:** Use **Preview Products** and page-preview modes to verify layout and content.
3. **Publish:** Hit **Publish** to make the collection live on your storefront.
Your new collection will now appear at its designated URL and be discoverable by customers.
By following this guide, you can efficiently build, optimize, and launch custom collections that leverage AI discovery, precise filtering, and tailored content—driving engagement and conversions across your site.
1. **AI Search** : Leverage Experro’s AI-powered discovery to find products by relevance and context.
* **AI Search:** Provide the keyword that you want to curate the products using Experro's AI-powered search.
* **Filter Products:** Use this toggle button to filter products using advanced query building with attributes such as brand, price range, inventory status, etc,.
* **Max. Products Limit:** Specify the maximum number of products that you want to add to this collection. The maximum number that you can specify is 10,000 items per collection.
* **Total Products:** Live count of items matching your criteria.
* **Preview Products:** Click to view a paginated sample before saving.
2. **Product Query**: Create filter-based queries for precise control over collection membership.
* **Product Query:** Select **Product Query** to add products to the collection by building a query.
* **Configure Product Query:** Choose any combination of attributes to build a query (e.g., category = “Shoes” AND in\_stock = true).
* **Max. Products Limit:** Specify the maximum number of products that you want to add to this collection. The maximum number that you can specify is 10,000 items per collection.
* **Total Products:** Live count of items matching your criteria.
* **Preview Products:** Verify your query logic by previewing a subset.
3. **CSV Upload**: Bulk-upload product IDs from your own system or spreadsheet.
* **Select CSV Upload:** Select **CSV Upload** to add products to the collection by building a query.
* **Choose File:** Import a CSV containing product IDs. You can download the sample file to understand how the csv file needs to be created.
* **Max. Records:** 10,000 rows per file.
* **Download Sample:** Get a template to ensure correct formatting.
* **Total Products:** Shows how many valid IDs were imported.
* **Preview Products:** Confirm the imported items before finalizing.
### 2. SEO Details
Optimize how your collection appears in search engines and social shares:
* **Title:** The page’s `` tag (e.g., “Spring Essentials Collection”).
* **Meta Keywords:** Comma-separated keywords for SEO (e.g., “spring fashion, linen dresses”).
* **Meta Description:** A concise summary to display under your title in search results.
* **OG Image:** Upload a 1200×630-px image (PNG or JPG, ≤2 MB) for social previews.
### 3. Collection Page Content
Enhance each collection page with rich content zones:
* **Top of Page Content:** Add banners, hero text, or featured product modules above the product grid.
* **Bottom of Page Content:** Insert FAQs, promotional banners, or related links below the products.
Use the rich-text editor to format headings, lists, images, and embeds. Each block can include dynamic tags (e.g., `{collection_name}`) to personalize the content.
### 4. Publishing Your Collection
Once your products, SEO metadata, and content blocks are configured:
1. **Save Draft:** Click **Save** to preserve changes.
2. **Review Preview:** Use **Preview Products** and page-preview modes to verify layout and content.
3. **Publish:** Hit **Publish** to make the collection live on your storefront.
Your new collection will now appear at its designated URL and be discoverable by customers.
By following this guide, you can efficiently build, optimize, and launch custom collections that leverage AI discovery, precise filtering, and tailored content—driving engagement and conversions across your site.