Creating a Merchandising Rule
Creating effective merchandising rules is essential for optimizing your product discovery experience. Experro’s intuitive interface makes it easy to configure rules tailored to your specific business needs. Select the apps icon at the top left of the application. Next, select Discovery from the dropdown menu. The discovery screen will be displayed.1
Click the Add Rule button
Click the Add Rule button at the top right of the Merchandising listing screen. A pop-up opens where you define the scope and basic details of the rule before configuring its behavior.
2
Define the Scope of the Rule
In the scope pop-up, choose where the rule will apply:
- Global Rule: Applies to all search queries and category pages across your website.
- Category Rule: Tailors the product display for category pages. After choosing Category, select either All Categories (applies to every category page) or Specific Categories (applies only to the categories you pick from the list).
- Search Rule: Activates on search queries. After choosing Search, select either All Searches (applies to every search query) or Specific Searches (applies only to the search terms you enter).
Only one Active rule of the same type can exist per scope. Experro will flag a conflict at save time if another active rule already covers the scope you’ve chosen.
3
Define the Functionality of the Rule
Provide a Rule Name and Description that clearly explain the purpose of the rule.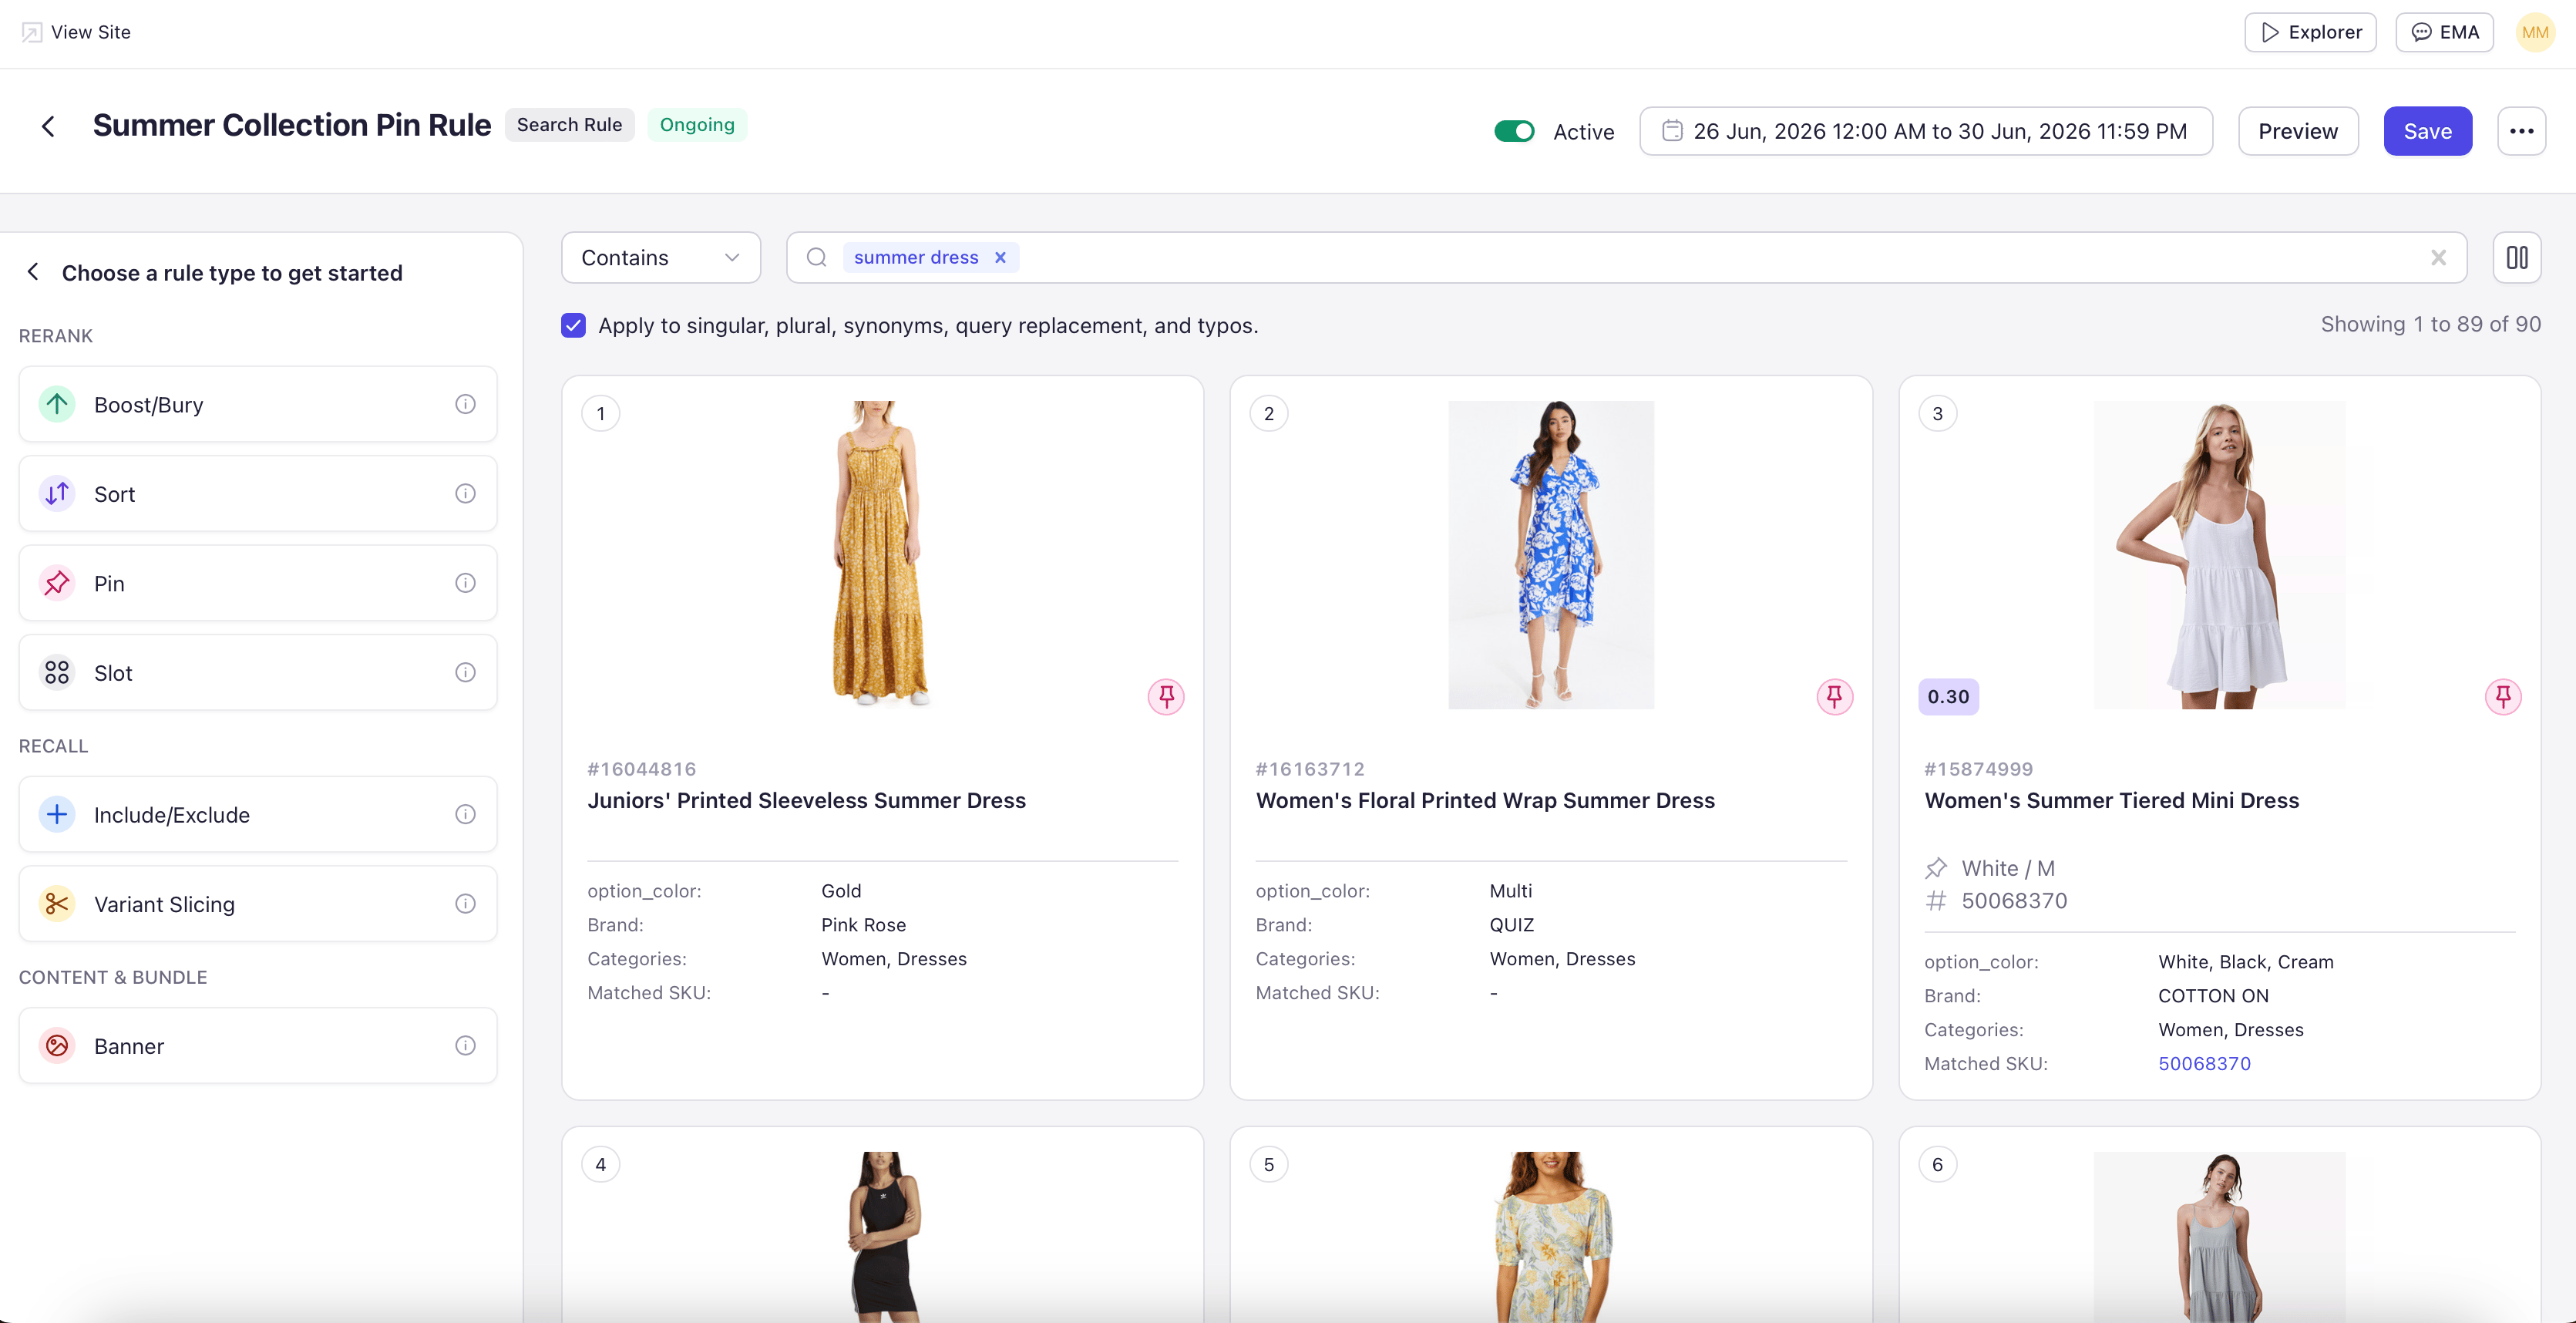
- Boost: Increase the ranking of a product.
- Bury: Lower a product’s ranking.
- Include/Exclude: Force the presence or absence of certain products.
- Sort: Rearrange products based on specific criteria.
- Pin: Fix a product or a specific product variant at a defined position.
- Slot: Reserve a specific position range for a product.
- Variant Slicing: Control which variant of a multi-variant product appears as the lead tile on the results page.
- Banner: Insert promotional content within product listings.
4
Specify the Triggering Condition (Keyword or Category)
- For Global Rules: No additional triggering condition is needed; the rule applies storefront-wide.
- For Search Rules with Specific Searches: Enter the search term(s) that will trigger the rule, and set a qualifier for each one. Qualifiers include Equal to (exact match), Contains, Starts with, and Ends with. For example, set “Equal to” with “Emerald Diamonds” to trigger only on that exact query, or set “Contains” with “diamond” to trigger on every query that includes the word.
- For Category Rules with Specific Categories: Select the relevant category (e.g., “Diamonds”) from your product catalog.
- For All Searches or All Categories scopes: No additional triggering condition is needed — the rule already covers every page in that scope.
5
Configure Products Inside the Rule
Depending on the rule type, the configuration step changes:
- Pin Rule: Search for the product, expand it to choose a specific variant if needed, set the pin position, and drag products into the order you want.
- Variant Slicing Rule: Choose the variant attribute to slice on (for example, color) and the priority order.
- Other rule types: Follow the specific configuration documented for that rule type in Types of Rules.
6
Specify the Duration
- Set the timeframe during which the rule will be active. This is particularly useful for time-sensitive promotions (e.g., festival or seasonal sales).
- Choose a start and end date so the rule activates and expires automatically.
7
Save and Activate the Rule
- Once you have configured the scope, functionality, triggering conditions, products, and duration, click Save.
- Every rule has an Active / Inactive toggle. Newly saved rules default to Inactive so you can review the configuration before it goes live. Switch the toggle to Active when you’re ready.
- Inactive rules stay saved in the rule list but do not affect the storefront. Use Inactive to stage rules for upcoming campaigns or to temporarily pause a rule without deleting it.
Managing Rules from the Listing Screen
The Merchandising listing screen gives you full context at a glance. Each rule row displays:- Toggle — Activate or deactivate the rule directly from the listing screen.
- Rule Name — With the rule type shown alongside it.
- Scope — The search term, category name, or “All Searches” / “All Categories” / “Global” label is shown inline. You no longer need to open each rule to check where it applies.
- Status — Active or Inactive.
- Duration — Start and end dates, where set.
- Modified At and Modified By — Last edit timestamp and user.
- Action — Edit, duplicate, or delete the rule.
Best Practices for Rule Configuration
- Plan Your Strategy — Define your merchandising objectives and identify the key metrics you want to improve before creating rules.
- Use Specific Criteria — Set precise conditions to ensure your rules target the right products and customer segments.
- Stage Before Activating — Save rules as Inactive first and review the configuration end-to-end. Activate only when you’re confident the rule does what you intend.
- Test Your Rules — Thoroughly test each rule after activation to confirm it works on the storefront.
- Monitor Performance — Regularly review rule performance using Experro’s analytics dashboard and make adjustments as needed.
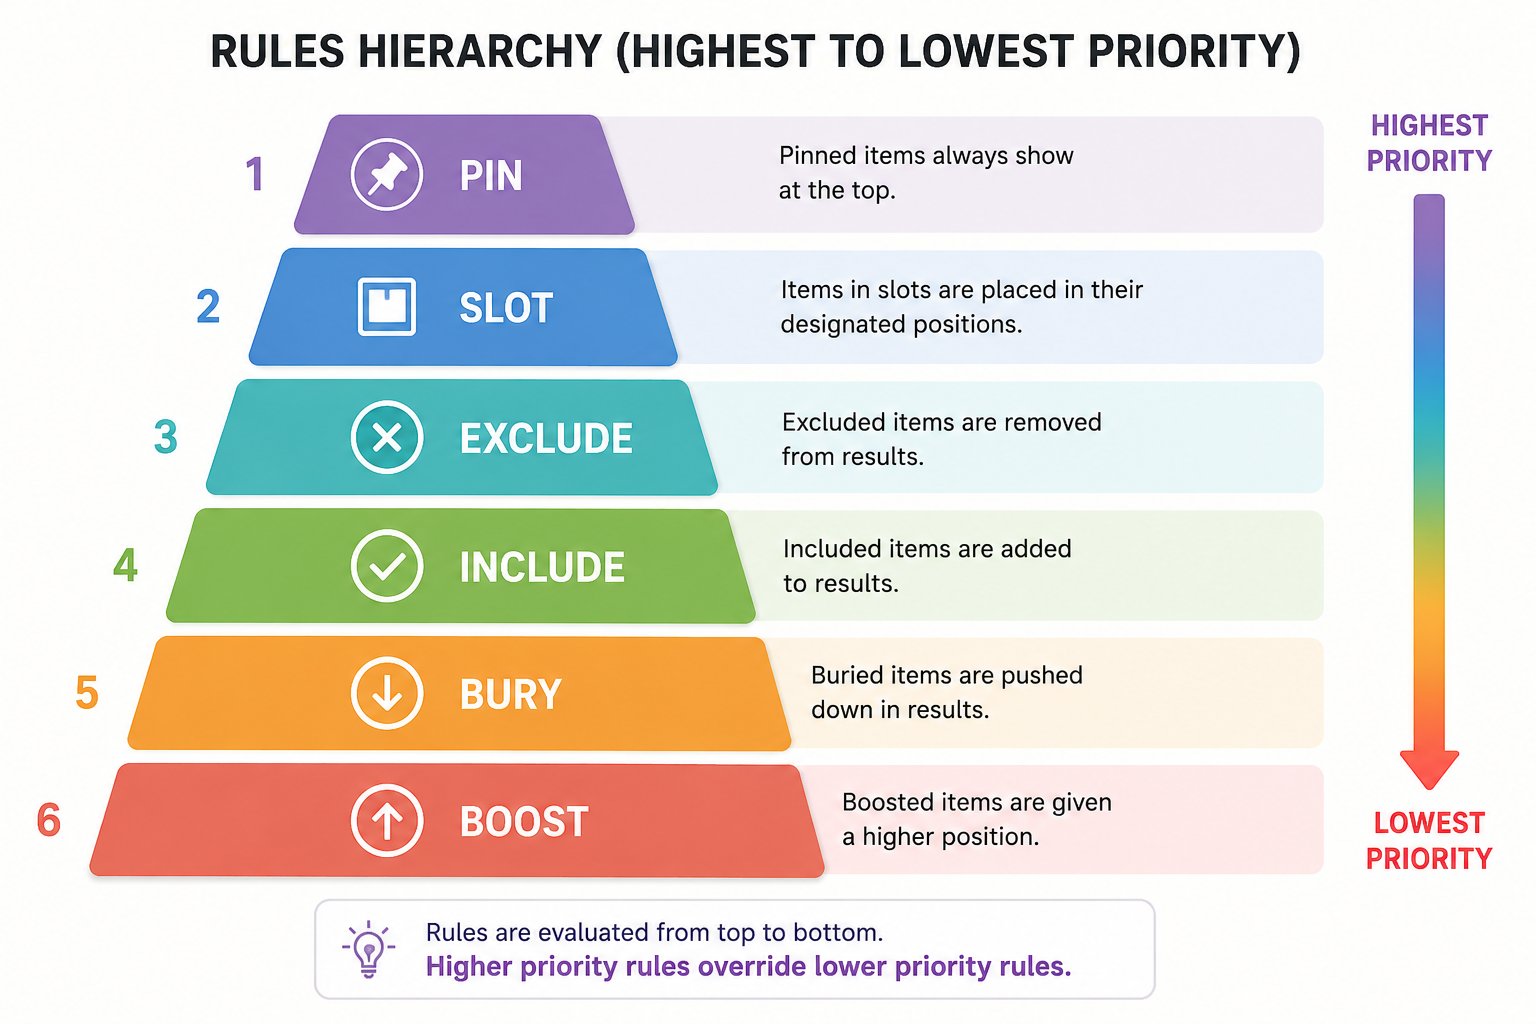
- Prioritize Rules — Understand the priority order of rules to avoid conflicts and ensure desired outcomes.
- Clear Naming Conventions — Use descriptive names for rules to simplify identification and management.
- Document Your Rules — Maintain records of rule configurations for future reference and troubleshooting.
Key Considerations
Pin and Slot Limits: The maximum position for pinning a product and the maximum slot range is 50, due to the display constraint of 50 products per page.
Priority Order
Experro applies rules in a defined order to manage conflicts: Overall Rule Priority: