Page Layout
Overview
The Page Layout setting determines where the facets (filter panels) appear on your category and search results pages. Proper facet placement is crucial for seamless navigation, helping shoppers refine large product lists quickly and intuitively. Experro offers four positioning options—Left, Right, Top, and None—so you can tailor the layout to match your storefront’s design and your customers’ browsing habits. You can individually configure layout settings for both Desktop View and Mobile View, allowing you to tailor the experience based on how users access your store.Facets Position Options
Left (Default)
- Description: Displays facets in a fixed sidebar on the left side of the page.
- Use Case: Ideal for most desktop e‑commerce sites where users expect traditional left‑hand filters. This layout keeps filters immediately visible without obscuring product listings.
Right
- Description: Moves the filter sidebar to the right side of the page.
- Use Case: Useful when your site’s primary navigation or promotional banners occupy the left margin, or when you want to create a more balanced visual flow with facets on the opposite side.
Top
- Description: Renders facets in a horizontal bar above the product grid. Filters stack or scroll horizontally, depending on screen width.
- Use Case: Excellent for mobile‑first or narrow‑width designs where vertical space is at a premium. Keeps filtering options within thumb reach without requiring a sidebar.
None
- Description: Hides facets entirely from the category and search pages.
- Use Case: Best for minimalistic layouts, single‑product collections, or curated stores where filtering is unnecessary. Eliminates visual clutter when there are very few items to browse.
Custom
- Description: Allows for a fully customized facet layout. Enables users to define unique placements tailored to their store’s design and functionality needs. Contact the Experro Support Team to create your custom layout.
- Use Case: Best for brands with unique UI/UX requirements, such as personalized shopping experiences or interactive product discovery pages. An example would be a store that integrates AI-driven recommendations alongside custom filtering.
How to Configure Facets Position
- Navigate to UI Customization
In the Experro Admin Panel, go to Discovery → Store Integration → UI Customization. - Locate Page Layout Section
Scroll to the Page Layout section where “Facets Position” is displayed. - Select Desired Position
Click the radio button next to Left, Right, Top, or None to choose your layout. - Save Your Changes
After selecting, click Save at the bottom of the panel. Your storefront will update immediately to reflect the new facet placement. - Preview & Publish
— Use the preview environment to verify the layout on both desktop and mobile. — When satisfied, publish to your live store so customers experience the updated design.
Best Practices
- Match Your Theme: Ensure facet placement complements your overall page structure—e.g., if your main menu is on the left, consider moving facets to the right.
- Mobile Considerations: For mobile-heavy traffic, the Top position often provides the most ergonomic filtering experience.
- Test User Flows: After changing layouts, run quick usability tests (or review analytics) to confirm users still find and use filters as intended.
- Iterate Based on Data: Leverage Experro’s Analytics dashboards to see how facet location impacts engagement metrics (e.g., filter clicks, conversion rate) and adjust accordingly.
Product Grid Layout
The Product Grid Layout settings let you control how products display on your category and search results pages—across both grid and list views, pagination behavior, and product counts. By tailoring these options, you can balance visual appeal, performance, and usability to suit your catalog size and customer browsing habits.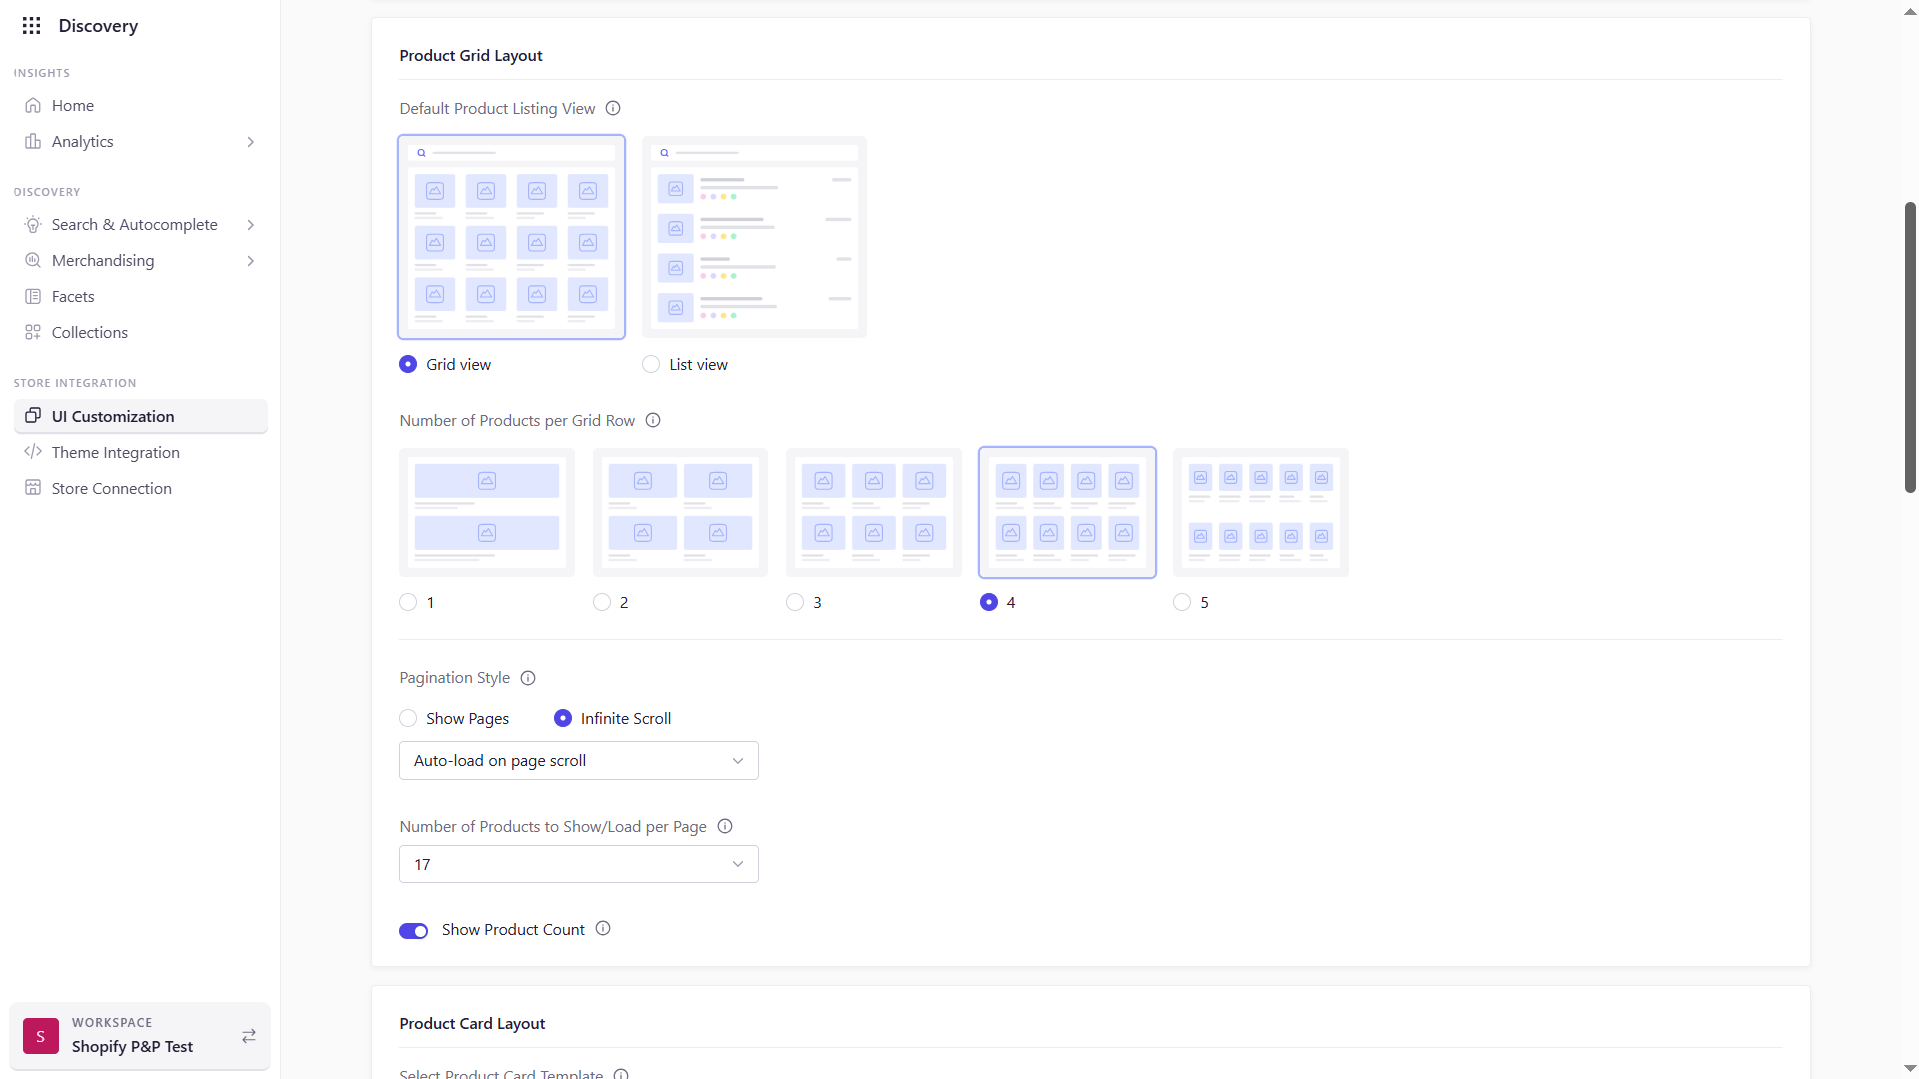
1. Default Listing View
Choose how products initially render when a shopper lands on a product listing.-
Grid View (Default)
Products display in a multi‑column grid, maximizing the use of horizontal space and emphasizing imagery. Ideal for visually‑driven categories (fashion, home décor) where thumbnails are key to engagement. -
List View
Products display in a single‑column list with expanded details (descriptions, specifications, ratings). Perfect for comparison‑heavy categories (electronics, B2B) where text and data drive purchase decisions.
2. Number of Products per Grid Row
Control how many products appear side‑by‑side in Grid View:
Adjust this setting to optimize for image size, whitespace, and overall page length.
3. Pagination Style
Determine how additional products load as users explore your catalog:-
Show Pages
Displays numbered page links at the bottom. Shoppers can jump to any page—ideal for large catalogs where specific navigation matters. -
Infinite Scroll
Loads more products automatically (or via a “Load More” button) as the user scrolls. Encourages continuous browsing, especially suited for mobile or social‑style shopping experiences.
4. Number of Products per Page
Set the total number of items fetched on each pagination or scroll event:- Range: Choose any value (e.g., 12, 24, 48, 100) to balance load time and page length.
- Default: 24 products per page.
5. Show Product Count
Toggle the display of the total product count at the top and/or bottom of the listing (e.g., “1,234 Products”):- Enabled (Default): Provides shoppers with context on catalog size.
- Disabled: Delivers a cleaner layout for minimalistic or curated collections.
How to Configure
-
Access Layout Settings
Navigate in the Experro Admin Panel to Discovery → Store Integration → UI Customization → Layout. -
Select Your Options
- Under Default Listing View, choose Grid or List.
- Adjust Products per Grid Row via the dropdown.
- Choose Pagination Style: Show Pages or Infinite Scroll.
- Enter your desired Products per Page.
- Toggle Show Product Count on or off.
-
Save & Preview
Click Save to apply changes, then preview on both desktop and mobile to ensure the layout meets your design and performance goals. -
Publish to Live
When satisfied, publish your customizations so shoppers experience the updated layout immediately.
Best Practices
- Test Across Devices: Verify grid density and pagination on desktop, tablet, and mobile.
- Monitor Performance: Use Experro’s Analytics to track page load times and abandon rates after layout changes.
- Offer Choice: Consider enabling view toggles so shoppers can switch between grid and list.
- Iterate Based on Data: Adjust “Products per Page” and pagination style based on session length and conversion metrics.
Product Card Layout
The Product Card Layout settings enable you to tailor how individual products appear in your grid or list views. You can choose between Experro’s built‑in template or build a fully custom card, then configure which attributes, buttons, and badges are shown. This ensures each product card aligns with your brand’s visual identity and functional requirements.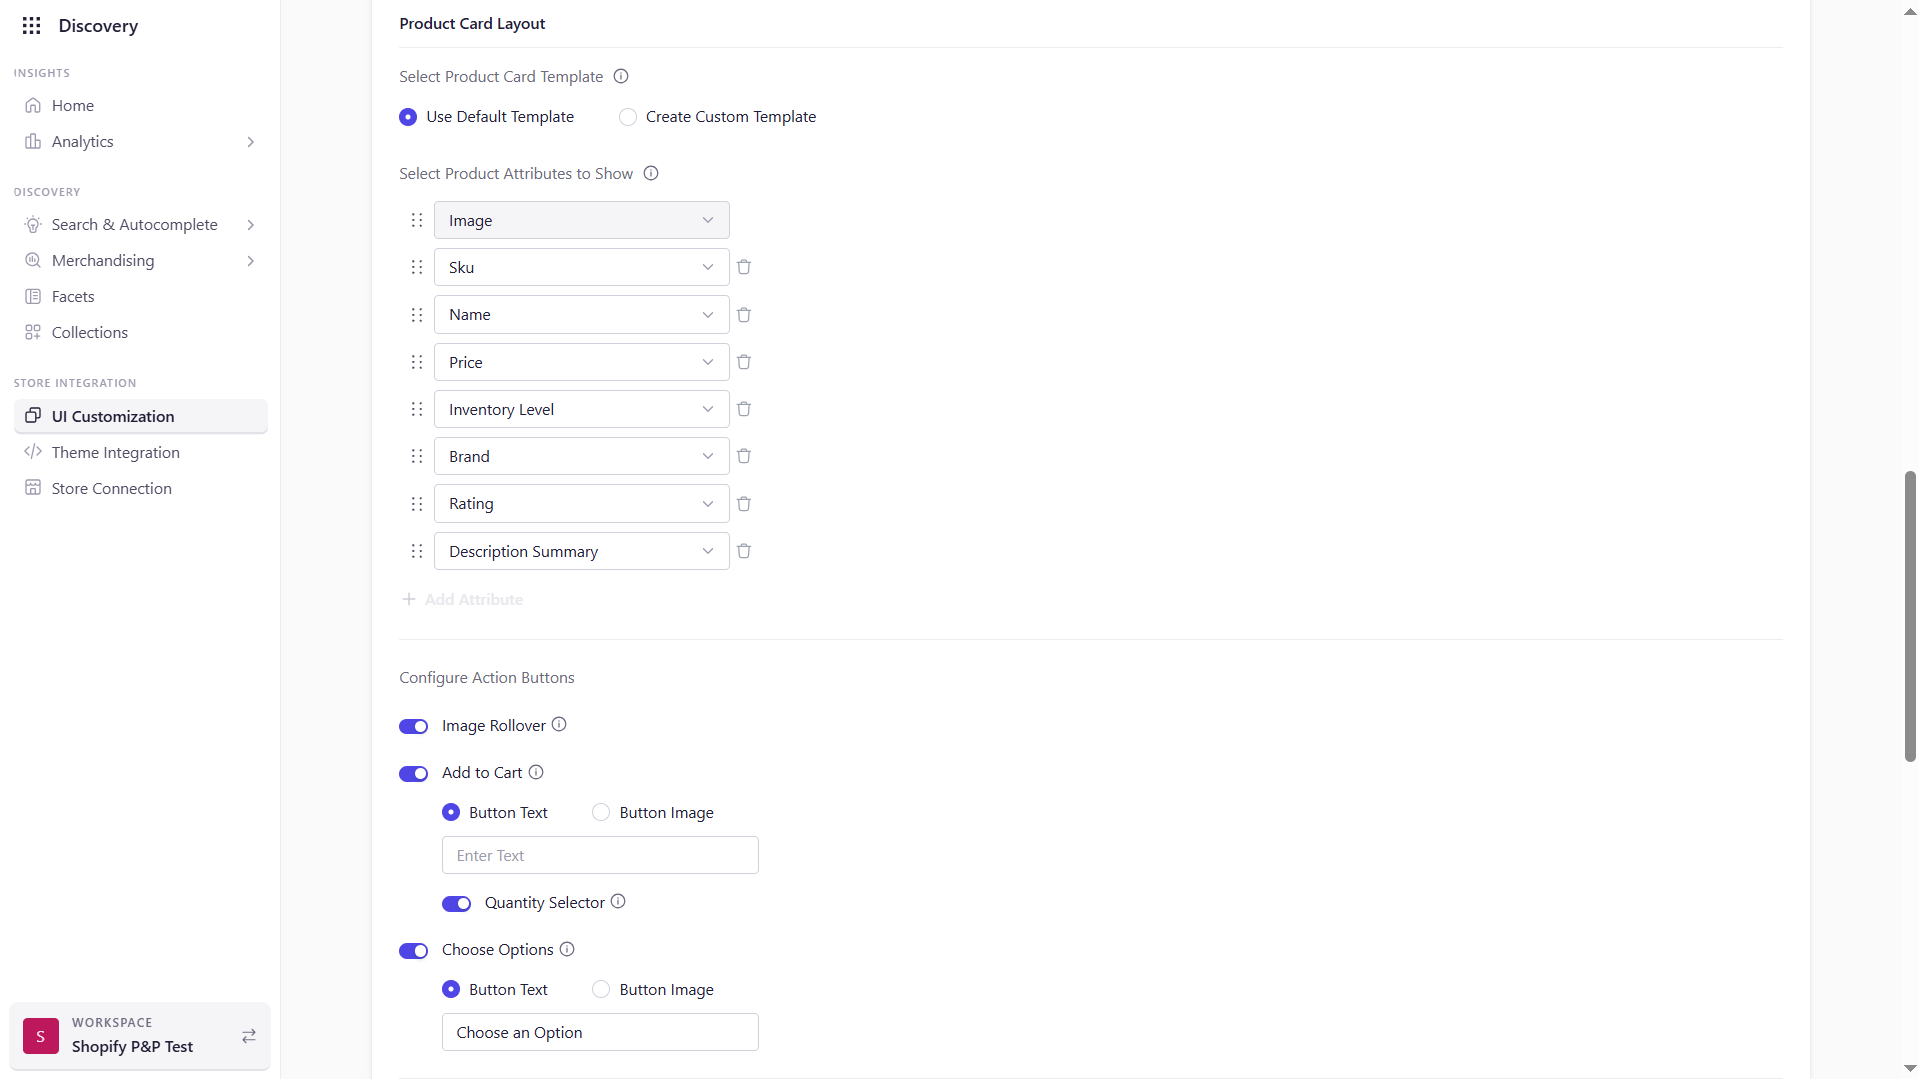
1. Template Selection
Use Default Template- Applies Experro’s standard card design, optimized for clarity and performance.
- Includes responsive styling, hover effects, and built‑in support for badges and action buttons.
- Opens Experro’s built‑in code editor where you can modify the HTML/EJS structure.
- Starts from the default template, so you only need to tweak specific elements.
- Warning: Switching back to the default will discard all custom code changes.
2. Visible Product Attributes
Select which product fields appear on each card. Drag to reorder; click the trash icon to remove.3. Action Buttons
Enable or disable interactive buttons to drive conversions directly from the card.-
Image Rollover
On hover, swaps to a secondary image (if available) to showcase alternate views. -
Add to Cart
- Button Text: Customize the label (e.g., “Add to Bag”).
- Button Image: Upload a graphic instead of text.
- Quantity Selector: Show an input field so customers choose quantity before adding.
-
Choose Options
(for products with variants)- Button Text: e.g., “Select Size.”
- Button Image: Use an icon or custom image.
4. Badges & Overlays
Highlight special product statuses directly on the card.-
On Sale Badge
Automatically appears when a product has a discounted price. -
Custom Badge
Enter a badge label (e.g., “New Arrival,” “Limited Edition”). Upload a badge icon or background if desired (PNG, JPG, SVG, GIF; ≤ 2 MB).
5. Default Thumbnail
If a product lacks an image, a fallback thumbnail ensures visual consistency.- Upload Format: PNG, JPG, SVG, or GIF (max 2 MB)
- Usage: Applied automatically to any product missing media.
6. Require Sign‑In to View Prices
Toggle on to hide prices for anonymous visitors and prompt sign‑in.- Behavior:
- Unauthenticated users see a “Sign In to View Price” link.
- Clicking redirects to your storefront’s login page.
7. Price Rounding
Define how prices round on the product card (e.g., to nearest whole dollar, .99 endings).How to Configure
- In the Experro Admin, go to Discovery → Store Integration → UI Customization → Layout → Product Card Layout.
- Template: Select Use Default or Create Custom.
- Attributes: Check boxes for each field you wish to display; drag to reorder.
- Buttons: Expand Configure Action Buttons, toggle on desired buttons, and customize text/icons.
- Badges: Enable On Sale or enter a Custom Badge label and upload an icon.
- Default Thumbnail: Click Upload, select your fallback image, and save.
- Require Sign‑In: Toggle the switch on/off.
- Price Rounding: Choose your rounding convention from the dropdown.
- Click Save, then Publish your changes to deploy to your live storefront.
Best Practices
- Keep It Clear: Only display the most essential attributes to avoid overcrowding the card.
- Drive Action: Position the primary action button prominently—use contrasting colors for “Add to Cart.”
- Maintain Consistency: Ensure your custom template’s typography and spacing match your overall theme.
- Test Variants: If using Image Rollover or Choose Options, verify that variant images and option links work as intended.
- Monitor Performance: Use Experro Analytics to track click‑through rates on buttons and refine your layout based on real user behavior.
Sort Options
Overview
Sort Options let you control the order in which products appear on category and search result pages. By offering both system‑defined and custom sorting methods, you ensure shoppers can organize product listings in ways that match their needs—whether that’s seeing newest arrivals first, browsing budget‑friendly items, or applying your own business‑specific ranking logic.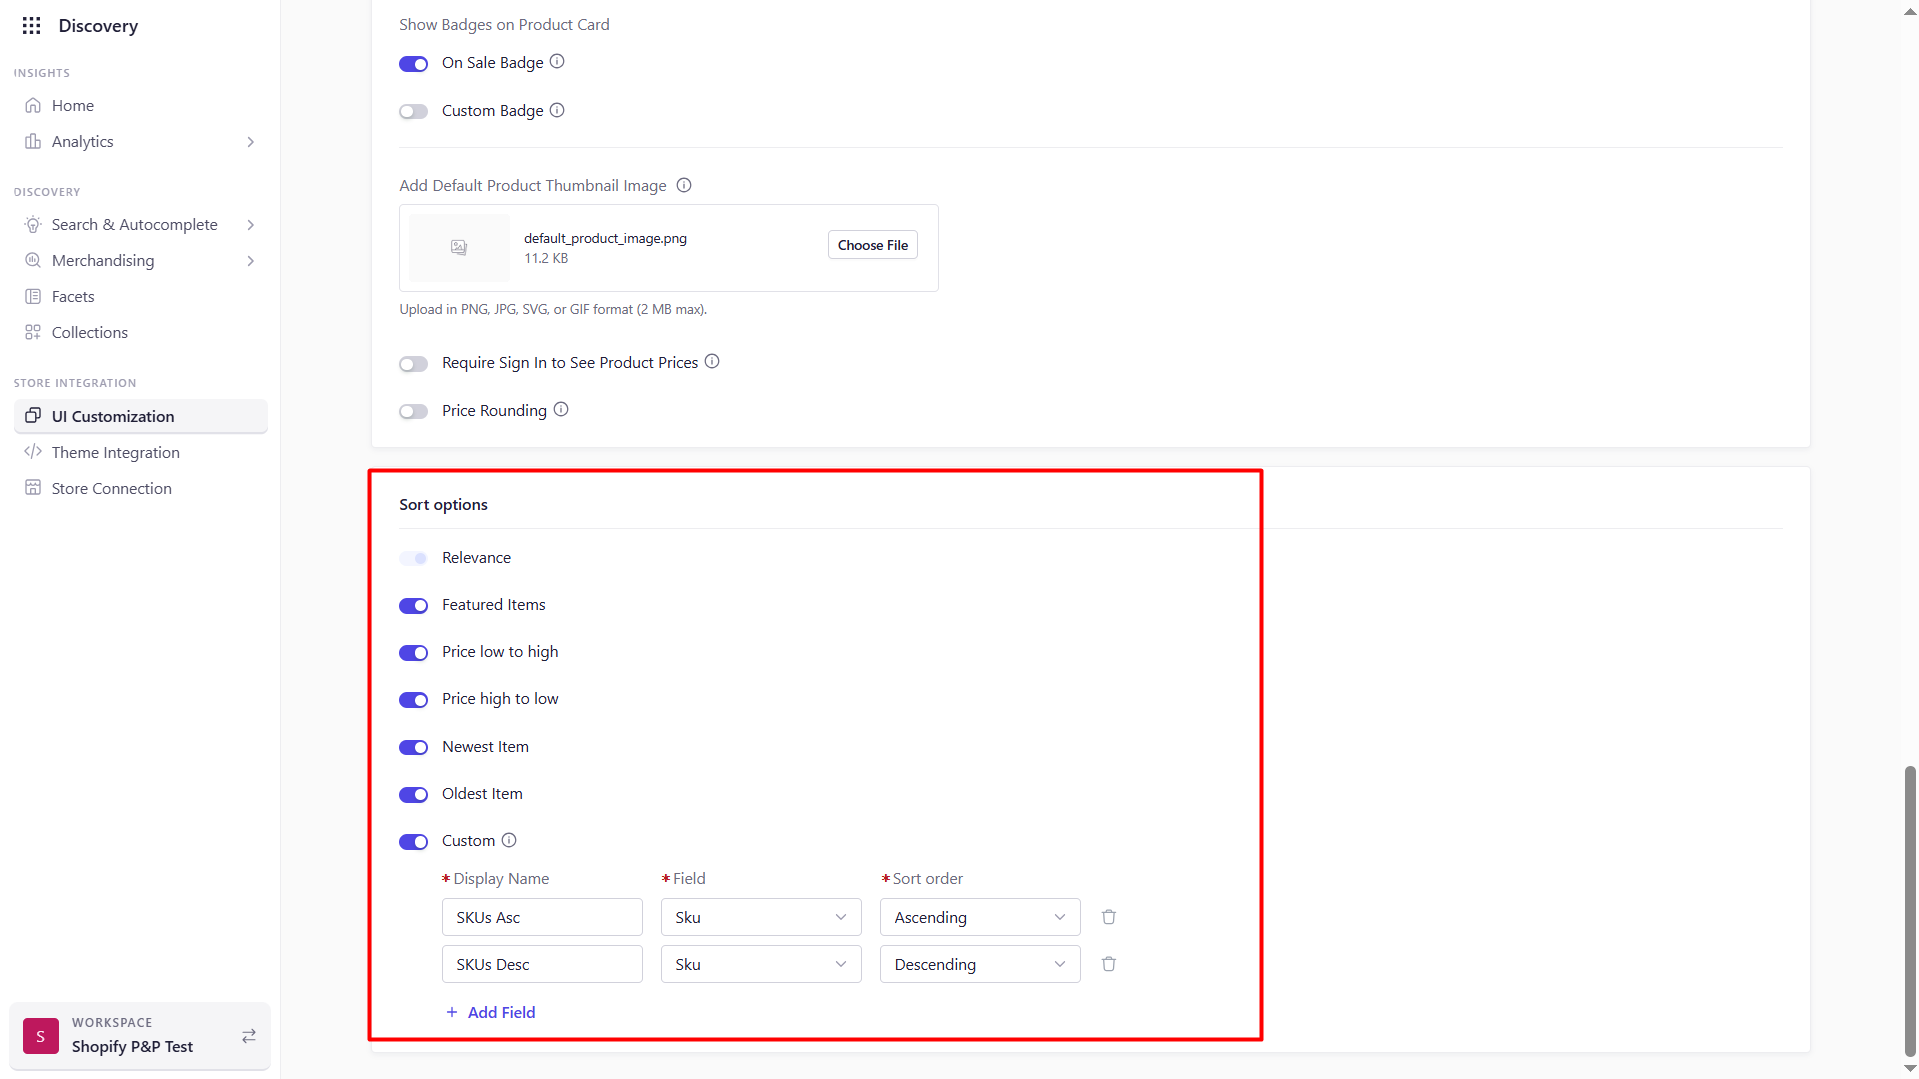
System‑Defined Sorting Options
These are built‑in sort modes you can toggle on or off. When enabled, they appear in the storefront’s sort dropdown:- Relevance (Default): Ranks products by how closely they match the user’s search terms or selected category.
- Featured Items: Surfaces products you’ve explicitly marked as “featured,” perfect for highlighting promotions or best‑sellers.
- Price: Low → High: Shows the most affordable items first, useful for budget‑conscious shoppers.
- Price: High → Low: Puts premium or high‑value items at the top, ideal for premium or luxury catalogs.
- Newest Items: Displays the latest additions first—great for fast‑fashion or frequently updated catalogs.
- Oldest Items: Surfaces legacy or clearance stock first, handy when you need to clear out older inventory.
Custom Sorting Fields
Beyond the standard options, you can define your own sort criteria based on any product attribute:- Display Name: The label your customers see in the sort dropdown (e.g., “Sort by Rating”).
- Field: The catalog field to sort on (e.g.,
rating,inventory_level,carat_weight). - Sort Order: Choose Ascending (ASC) or Descending (DESC).
Configuration Guide
-
Navigate to Sort Options
In the Experro Admin Panel, go to Discovery → UI Customization → Sort Options. -
Enable/Disable System Sorts
Use the toggles beside each built‑in option (Relevance, Featured, Price, etc.) to include or hide them in the storefront. -
Add a Custom Sort
- Click + Add Field beneath the Custom section.
- Enter the Display Name, select the Field, and choose ASC or DESC.
- Click Save to make it available to customers.
-
Set the Default Sort
Choose which sorting method appears first when a user lands on a category or search page. -
Preview & Publish
Switch between desktop and mobile views in the preview pane to confirm your sort dropdown looks and behaves correctly. Then click Publish to apply changes live.
Best Practices
- Keep It Focused: Offer only the most relevant sorts—too many options can overwhelm shoppers.
- Clear Labels: Use customer‑friendly names (e.g., “Price: Low → High” rather than “price_asc”).
- Logical Order: Place the most commonly used sorts (Relevance, Featured, Price) at the top of the dropdown.
- Test Regularly: Track which sorts customers use most via analytics, and refine your available options over time.
- Performance Considerations: Ensure that custom sorts on large datasets remain responsive; consider server‑side indexing or caching for heavy fields.